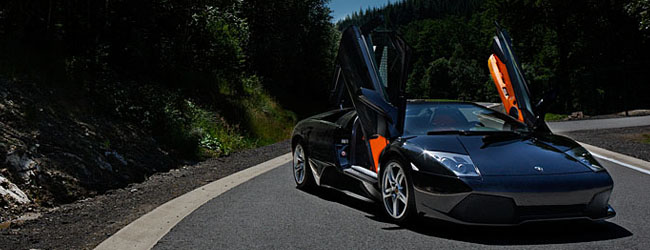
CASE STUDY - LAMBORGHINI MURCIéLAGO LP640
Canon EOS40D - Canon EF-S17-55mm f/2.8 IS USM - 17mm f5.6 ISO100 multiple exposures
Case study by Mark
When I was visiting SpaItalia in 2008 a good friend showed up on Sunday bringing his brand new Lamborghini Murciélago LP640 Roadster ... which he only picked up on Thursday, so it had done but a few hundred Miles from new when I was able to photograph it.
I convinced him to take the car just outside the grounds so we could avoid the crowds at the show, I soon found a very nice location on one of the access roads to the Spa Francorchamps paddock area, the only problem was that it was a bright summer afternoon, 14h to be exact ... not the most perfect time to shoot a black car on a light road with the sky in the background, but I knew I could get a great shot if I applied the correct techniques to it.
The basic shot
 I decided I needed bracketing for this one, problem was that I didn't have my tripod with me and hand held multiple exposures aren't as easy as it seems. I dialed in a bracketing setting on my Canon EOS40D that would get me three exposures, each with a full two stops difference which gave me exposure times from 1/100 over 1/400 right up to 1/1600, perfect for what I had in mind.
The 1/400 shot was the one the camera decided as being correctly exposed, and surely it didn't look too bad, but the sky was a bit blown out and the black car was ... well black, not too much detail could be seen. The 1/100 shot on the other hand clearly showed all the detail in the black car, but just about everything else became too light, and this is where the 1/1600 shot comes to the rescue. The car now became a black spot on the photograph, but the sky was a nice blue shade this time.
So I knew that with these three shots I could create a fully balanced shot that would give me a nice blue sky, dark foliage on the trees and still have the black car nicely detailed and sharp, one thing that also worked to my advantage was the fact that there wasn't too much wind that day, especially when you have trees in the background you could get into trouble taking multiple exposures as the foliage moves too much between shots, but this wasn't the case and I could get straight to work once I transferred the shots to my computer at home.
Getting to work
As I always work in RAW I still had some extra room for the exposure, remember that ACR (Adobe Camera Raw) allows you to move the exposure of a RAW file from -4 stops to +4 stops, so even with 1 stop increments you can get a total of 9 shots from only one capture, how's that for flexibility ? But as I already had three different exposures I used them, starting with the 1/1600 shot I 'developed' a -1 stop, a +1 stop and an unmodified exposure, same thing with the 1/100 shot.
The 1/400 shot I just left original, with this workflow I ended up with no less than seven exposures, each one slightly different than the next one, this would allow me get all the gradations into the final shot I needed.
 So I created a new image in PhotoShop with the same dimensions as the original shot and inserted all exposures as layers into this one, naturally as I didn't have a tripod with me I had to manually align the shots, but this isn't as difficult as it sounds. Just lower the opacity of the top layer and start moving it around, at a certain position it will perfectly align with the layer below. Naturally it helps if you have some decent shutter speeds, at 1/400 you don't have the chance to move the camera too much so the subsequent shots nicely align almost perfectly, also take into account the high fps rate of a modern DSLR and you could get away with not using a tripod for this.
Layer blending
Now I had an image with no less than seven layers, with the lightest one at the top, so I started looking which parts of the shot I would keep from this top layer, this way I work my way down to the lowest layer from which I would use only the sky because it was so nicely deep, saturated blue.
 Select the top layer and put a mask over it (Layer > Layer Mask > Hide all) that hides the entire layer, you will notice a fully black mask appearing in the Layers window, new select the Brush tool (Press 'B') and make sure that white is the foreground color (press 'D' and 'X') and start painting over those parts that you would like to have visible on this specific layer ... in my case I decided the grille in the front bumper could be used from this otherwise totally over exposed shot.
When I'm happy with the items visible in this layer I can continue with the layer underneath it, again create a layer mask (Layer > Layer Mask > Hide All) but this time I actually duplicate the mask from the layer just above it by pressing 'Alt-click' and sliding that mask onto this one (Option-click on Mac).
 And again I start drawing over the parts that I would like to see from this second layer ... when done do the same on the third layer, the fourth one, the fifth one, the sixth one and by the time you are reaching the bottom layer you should have a mask that shows everything, as all the important parts in this lower layer are covered by parts from the layers above.
Layer masking will take some serious time to get right, don't worry about it, this actual shot took me about 30 minutes in total until I was satisfied with the look of the overall image.
Mind the details
Once you get the masking right and are happy with the exposure in general it is time to start thinking about the usual post processing, in this shot for instance I had a pipe in the background on the right, on the left there is a person standing in the way, the license plate draws way too much attention and despite the car being only four days old, the front was already a battlefield of bugs.
All these items require attention, and I started out with the guy in the shot, but because I'm working with seven different layers I can't just start cloning with this image, there is however a workaround for this : create a new layer (Layer > New > Layer ...), there is no need to change anything in this dialog box except the name perhaps, I always use names I can recognize afterward, so this one I called 'Remove person in the shot'.
Removing unwanted items in the background
 Now select the Clone Stamp tool (press 'S') and select a nice brush size, I always start out with about 100px and work my way down as I start to work on the details, this way the cloned area is feathered and blends really nicely with the rest of the background. One thing that is very important here is the 'Sample : All Layers' setting, this one actually tells PhotoShop to use all the underlying layers and not just the current layer, this is just what I need as I have seven layers lurking underneath my cloning layer.
'Alt-click' (or Option-click on Mac) on an area you think would be good to 'cover' our guy in the background and start painting over him, you'll see him disappear into cyberspace and when you've selected the origin right the new parts will blend into the overall image perfectly.
The same technique I used to get rid of the pipe at the left, so I will not describe it in detail again, I made a new layer and cloned some of the background over the rusty pipe to keep it from drawing attention in the shot. But there is still a lot of work to do on this frame, those bugs on the front bumper are really 'bugging' me so I went ahead and created yet another layer called 'Clean up', this would allow me to start my virtual car wash on the Raging Bull.
Virtual car wash
 I could continue to use the Clone Stamp Tool for this, but actually PhotoShop has a better option, use the Spot Healing Brush Tool (press 'J') which will sample surrounding pixels to cover the area you click on, a great tool in fact, the only problem is that when you are near a seam it doesn't work perfectly, so for those parts I will have to revert back to my trusted Clone Stamp Tool. Again don't forget to activate the 'Sample All Layers' option for the Healing Brush too, as this will sample from all layers at once, just what I need in this case.
By carefully selecting the 'bugs' with the Spot Healing Brush Tool I am able to remove most of the carnage at the front of this Lamborghini, however those that are too close to the seams will require a touch with the Clone Stamp Tool, selecting the sample point with care will show no traces of the high speed the owner drove down to Spa Francorchamps, do note that a tablet (from Wacom for instance) is a great help to get this done right, the mouse works nice, but a pen and tablet combination works so much better, too bad they are so expensive.
Some more cloning
 This car became rather famous during it's life, so the license plate wasn't a big issue for the owner, however I always either remove or cover this license plate on the cars I photograph for privacy reasons, and this shot is no different, so again a new layer (Layer > New > Layer ...) and working with the Clone Stamp Tool. The license plate is too large to use the Spot Healing Brush Tool, so the only option remaining is either to paste a new license plate on top of the original one (with my website on it) or to carefully clone it away from the shot completely.
 With shots like this it is always a good idea to put them aside for a day or two and return to them afterward, this will allow you to notice small items that you might have missed earlier, like the dark reflection just in front of the right headlight.
It missed my attention the first time round, but this time it just had to go, so back to adding a new layer and my trusted Clone Stamp Tool (press 'S' remember ?) I'm back in business, carefully working my way around this reflection with ever decreasing brush sizes ... another few minutes of work and I'm almost finished, just tackle a few more details and the shot is ready to be published.
Perfection is in the details
I'm almost finished here, but as always the real power is in the small details, did you notice the top of the doorpanel is just a bit too bright ? So I added a 'soft-light' layer and paint black over it to make a little softer, lowering the opacity of this layer made it blend in with the rest of the shot nicely.
 Also that shiny spot next to the headlight on the right really bothered me too, so yet another layer and some black painting covered it up nicely, but not enough to my taste, so I removed the layer, created a new one and went back to work with the Clone Stamp Tool ... resulting in a perfect 'cover up' of this spot and a nicely balanced exposure overall of the shot.
If you look close enough you'll notice a small sparkle on the left headlight, I decided to add a larger one in post processing, just select the right brush in PhotoShop and you get a near perfect sparkle to add to shots like this one.
Overall I'm pretty pleased with the shot as it came out, I added another levels layer to make the sky and the road in front of the car just a bit darker and one more 'soft-layer' that I masked to cover only the sky, filled it with a gradient from black to transparent and I think I'm done here ... the owner was really pleased with the shot anyway, so what more could I ask ?
 |
CPT Premium member BONUS : 63156 As a Premium member you can download this complex case study and print it on your local printer, our PDF is optimized for hard copy output, we even include the psd file so you can take a look at all the layers used. |
Note : commercial use or publishing of our tutorials in any way, written or electronic, is strictly forbidden, we present these for your personal development only. None of our material may be published in any way without prior, written permission from the Car Photography Tutorials founder. All workflows and photographs are copyright protected and owned by the Car Photography Tutorials team unless stated otherwise
Advertisement
Become a MEMBER
Premium Membership
Become a CPT Premium Member and download all our tutorials including a PDF for printing and the result as a PSD file with layers if any.
Interesting articles
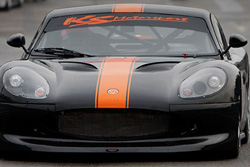
Case study - DOF, Depth of Field
This shot was taken while the black Ginetta was leaving the pit lane at a famous circuit in Belgium, it looked good straight out of the camera, but a little bit of tweaking made it perfect.
Buying a tripod for car photography
A lot has been going on about tripods, do you really need one when your main objective is to photograph cars ? We go over the advantages and the problems and help you to select the best one.
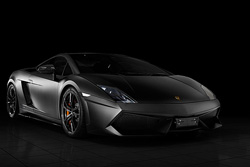
Creating a photo from a showroom snapshot
Sometimes you just don't have the option of setting up a nice area for a shoot, for instance when you are in a showroom, but fear not, we show you how to make a photograph out of a snapshot in post processing
Our TOP 10 tips for post processing using PhotoShop
In this tutorial we present you with 10 interesting and quick tips that will make your post processing automotive photographs in PhotoShop a bit easier.
The secrets behind a great car photo
Ever wondered why your shot doesn't look as good as the one of the same car in that magazine in front of you ? We give you a few tips to take better photographs here.
Keep up with CarPhotoTutorials
Why not follow us, become a fan, get our RSS feed or mail a link to a friend ?
![]()
![]()
![]()