FILTERS IN THE DIGITAL AGE
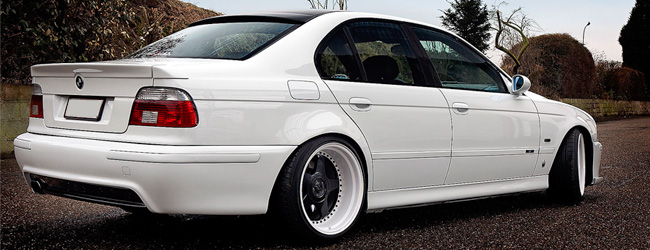
Canon EOS 40D - Canon EF-S17-55 f/2.8 IS USM - 23mm 1/40 f4.0 ISO 100
Intermediate level tutorial by Johan
 If you take a closer look at the front of your lens you will notice a thread allowing you to screw in extra stuff in front of your lens, this is meant for filters in fact, something that was used a lot in the analog days before Adobe PhotoShop and similar photo editing software became widespread.
Today a lot of these filters can be simulated on your computer, so you no longer have to walk around with extra filters in your camera bag in case you want to try something different, however not all types of filters can be replicated in post-processing, some of them are still very useful today, in the digital age.
The problem is which filters should you add to your shopping list and which ones aren’t really useful when it comes to shooting cars? The answer here is twofold in fact, naturally the circular polarizing is the most important filter an automotive photographer should get, but there are some other filters that could prove really useful when you are out in the field shooting that exotic super car that just showed up in the parking lot.
1. The most important filter:
 if you want (or can afford) to buy only one then go for a decent circular polarizing. In our opinion this is the single most important filter you should use when shooting cars, the problem is that a good one will cost some money. We would advice to go with the well known B+W or Hoya filters, these are well tested and perform very well without any compromise on quality and have none to very limited image degradation which is the most important aspect of a filter.
You could buy a nice little polarizer for next to nothing (from eBay for instance) but believe us, they will harm you shots more than they will help you, so just don’t bother with them, get a B+W or Hoya to spend your money well.
Before heading out to the store take a look at your lens, especially the front, you should be able to find the diameter of the filter you’ll have to acquire, most Canon L-Lenses for instance use a 77mm filter, so you only need to buy one that will fit most of your lenses at the same time. If you have different lenses make sure that you get a filter for each diameter that you are using for your shots … or use a modifier: obtain the largest format filter and use ‘step-down’ rings to fit this filter on smaller lenses.
1.1 Do you need a slim filter ?
Most of the time we would say no to this question, but first let’s take a look at what they mean by a ‘Slim’ filter. This is nothing more than a filter that it thinner than a regular one, and most of the time a lot more expensive, and you probably don’t even need it after all.
When do you need it then ? When you are working with a full frame camera (style Canon EOS 5DMkII or Nikon D700) and use a wide angle lens, only in this case would the extra cost of a slim line filter make sense. If you fit a normal polarizing filter on a 16mm lens used on a FF camera you’ll be getting a vignette on your shot … the corners become darker because the filter comes in view.
 If you are working with a crop-sensor camera (Canon EOS 50D, Nikon D300) there is no need for a slim line filter as you are only using the center of your lens anyway, on a crop-sensor camera the outer corners of your lens are never used.
We even used a normal 77mm B+W Kaseman Circular polarizing filter on our Canon EF-S10-22 lens at 10mm with no vignette visible whatsoever, and even if there is a slightly darker range in the corners, who cares, they bring out the car in the shot even better as attention is automatically drawn to it, away from the corners in the first place.
1.2 Using the circular polarizing filter
A good CP filter will have two parts, a rear ring and a front ring, the rear one is screwed onto the lens until it is fixed (do not overdo this as you might have problems removing it afterwards) while the front ring allows you to turn the filter, which is why you are using it in the first place.
 After fitting the filter compose the shot with the car you would like to shoot, once you are happy with the looks of your image you should start turning the front ring on your filter … keep a close eye on your viewfinder and you’ll notice the image changing. When you apply this filter at the correct angle you should be able to remove most of the reflections on the bodywork and windows … in one plane.
When you are doing a three/quarter front view of a car it will be next to impossible to remove the reflection on the windshield and on the side windows at the same time, because the angle of light on these two is totally different. So how can you solve this ? Simple, take two shots with your camera on a steady tripod and turn the filter in between, one shot will have a clear windshield while the second shot will have clear side windows, afterwards combine both exposures in Adobe PhotoShop to one image.
2. The optional filters
Next to the circular polarizing filter there are a large number of extra filters you could buy over time, some more important than other depending on your shooting habits, or the field of automotive photography you wish to specialize in.
2.1 the ultraviolet filter
This specific filter has been the source of many, sometimes heated discussions on forums for years, some will never use it, other will use it all the time, so let’s take a look at why this is such a ‘hot’ filter.
The UV filter does next to nothing to improve your shots, it’s sole purpose is to take care of a blue cast that is sometimes visible in shots taken at high altitudes, unlike the polarizer you will not see much difference with this filter in front of your lens. Why would you buy it you might ask ? As a protection in the first place, that is why most people mount an UV filter on all their lenses, as did we at first to be honest.
An UV filter is perfect to protect the expensive front element of your lens from scratches, dust, grinding and even breaking altogether. If you are shooting a rally were the gravel can be thrown around towards you, an UV filter could safe your day if one of these little stones happens to find it’s way onto your lens.
 The front glass element on your lens is rather expensive and if it happens to brake your shoot ends, if you brake an UV filter you can remove it and continue to shoot anyway.
We have been buying an UV filter with each and every lens we bought, but recently stepped away from this idea … for quality reasons. You can look at it from any angle you like, but adding an extra piece of glass in front of your lens will only degrade it’s quality, most of the time this is a very minor loss of quality, but expect some more flare when the headlights are shining right into the lens with the UV filter mounted.
We do always put the shade on the lens, this gives better colors and protects from glare, but it also protects the lens in case we happen to bump into a wall or pole while turning around. A shade will however not help when you have stones flying round when a race car hits the gravel pit, one will find it’s way right onto your front glass all the time.
So when we do a shoot with a car we never put UV filters on the lens, only a circular polarizing one, however at the track or during a rally we will fit one to protect our lens … just in case.
2.2 The ND filter
This is a Neutral Density filter and it’s sole purpose is to limit the amount of light that is able to enter the lens. Now why would you allow less light to reach the sensor, the thing about shooting cars is that you never have enough light you might say … well, this isn’t true in all cases to be honest.
Sure you need light to make your car’s metallic paint shine, but by using an ND filter you can use longer shutter times to give an impression of speed, or to remove unwanted people in the background …
 An example : you are at a rather popular event and you are photographing a car that is on display, the only problem is that you are not able to get a clear shot because people keep coming and going around the car. You have two options here : get a few assistants that can play police officer and keep people away for a minute (but this isn’t an option in most cases) or you use a very long shutter time with the camera fixed on a tripod. In this latter case you can do an exposure for 15 or 30 seconds, most people in your shot will have moved during that time so you have a relatively clear shot as a result, perhaps some smudges of people that didn’t move a lot, but still a very useful image to be published. (This doesn’t work if the car is on a rotating platform by the way, in this case we have another solution you can read in our ‘your first indoor event’ tutorial)
ND filters are also used on rig shots (read all about them in our ‘Rig shooting made easy’ tutorial), because the trick about a rig shot is to give the impression of a fast moving car while in fact it is moving very slowly. The impression of speed in a rig shot it created by using a long exposure, which during the day is only possible with a powerful ND filter.
This type of filter exists in various strengths, some remove 1/3rd stop of light while other can remove 3 full stops or more, depending on the application you will be using it for. They are still rather expensive and sometimes hard to obtain as many shops do not have them in stock because they are a bit of a specialist filter only used by landscape and automotive photographers.
2.3 The Graduating filter
This typical filter is actually based on the ND style of filters, but here you get a gradient, the Neutral Density is 100% at the top of the filter and goes to 0% about halfway down. This is also called a Graduated Grey and is mostly used when you are shooting a car against a very bright sky.
The graduating filter will ‘cover’ the top of the shot, where the light blue sky should be, but will leave the lower part of the shot completely open so you have an exposure of say -1 at the top and 0 at the bottom which will allow you to capture an intense blue sky with white clouds and still not overexpose the car in the foreground.
This again is a specialist filter, and at the moment we don’t use it for car photography, a similar effect can be reached digitally in Adobe PhotoShop by using a gradient on an ‘overlay’ or ‘soft light’ layer. However if you don’t like post-processing an ND Grad filter might be a good idea, bracketing your shots and putting them on top of each other in PhotoShop could be a better idea on the other hand.
3 Bottom line
That’s about it, naturally there are still a large collection of other filters out there, the Warming filter, the Macro filter, the Soft filter … etc, but for our purpose we think that the ones mentioned in our article are about all you might ever need, and remember, our Adobe PhotoShop has a lot of digital equivalents anyway, they may not always give the exact same result as a filter would have given us, but we manage to get where we want with the filters we do have and a bit of post-processing.
Always remember that it is better to have one filter that you actually use than having ten filters that never leave your bag because it is too much hassle to mount and use them.
 |
CPT Premium member BONUS : 61142 If you would like to print this Filters in the digital age article you can download our special PDF which is optimized for hardcopy layout. |
Note : commercial use or publishing of our tutorials in any way, written or electronic, is strictly forbidden, we present these for your personal development only. None of our material may be published in any way without prior, written permission from the Car Photography Tutorials founder. All workflows and photographs are copyright protected and owned by the Car Photography Tutorials team unless stated otherwise
Advertisement
Become a MEMBER
Premium Membership
Become a CPT Premium Member and download all our tutorials including a PDF for printing and the result as a PSD file with layers if any.
Interesting articles

Must have base equipment
In this article we talk you through the large amount of camera's you could buy to get started well in automotive photography.
Our 60 second workflow on automotive photos
Only have a minute to spare ? Don't worry, that's more than enough to make your photograph stand out of the crowd.

Sharpening techniques explained
A lot has already been written about how to make your images look better, getting them sharp is one of the essentials when it comes to improve your shots
Background replacement made easy
There are times you've managed to photograph a great looking car, but the background is far from good looking ... no problem, just replace it with a different one.
Creating a photo from a showroom snapshot
Sometimes you just don't have the option of setting up a nice area for a shoot, for instance when you are in a showroom, but fear not, we show you how to make a photograph out of a snapshot in post processing
Keep up with CarPhotoTutorials
Why not follow us, become a fan, get our RSS feed or mail a link to a friend ?
![]()
![]()
![]()