RUNNING PHOTOSHOP ACTIONS WITH A G13 OR G510 GAMING KEYBOARD
Gaming keyboards work perfectly for automated workflows in PhotoShop
Intermediate level tutorial by Mark
I for one am a firm believer in automating things for post processing, I have been using actions in Adobe PhotoShop for ages now, and the only problem I had with them was remembering the key combination to run entire workflows in one go. I know my list of actions is a Mile long, so finding the exact action I need for a specific image and hitting the ‘play’ button on the menu didn’t quite do the trick for me either, so I went on the lookout for something more practical.
On the other hand I have been using wireless keyboards and mice for a very long time too, for a keyboard I think it still looks cool, for a mouse the wire just gets in the way most of the time … but I always ran out of batteries on the worst time ever, and some keyboards just didn’t catch up on multiple key strokes … a real problem when using CTRL-ALT-SHIFT-F8 to run an action for instance … so I got fed up with wireless keyboards in the end and decided to buy a good quality keyboard with an USB cable attached to it.
You might not have cought this, but I’m a bit of a gadget guy to be honest, so a plain and simple keyboard wasn’t going to cut it in my mind, so I went on the look out for something special … and trust me, there are some really weird keyboards available out there, some great … others not so good.
However one thing the ‘better’ keyboards all had in common: a steep price. Back in the days I would buy a good quality keyboard with an USB cable for about €25, those days are long gone … think about €75 to €299 for a high end keyboard these days, and as I’m a programmer too I tend to use a keyboard a lot … and I mean a lot here, usually those nice matte finish keys start to go glossy after only 12 months or so in use in my case, so I need a good keyboard with a nice responsive key stroke … read a nice ‘click’ sound.
Back in the days of my wireless frenzy I bought a Trust keyboard, nice and cheap … but not so good nor fast enough for my typing, so I replaced it with a Logitech keyboard/mouse set … in the end I went through about five sets from Logitech including the stylish DiNovo kit (very expensive but extremely good looking) and the good value for price S510 unit … I even tried two MicroSoft wireless keyboards and their wired ‘Office’ keyboard. I have to admit the MicroSoft keyboards are nice to type on, but I always prefered Logitech units for their styling … which is my personal opinion naturally.
Usually I tended to ruin the mouse way before the keyboard had to be replaced, so I ended up buying high end mice too, units like the MX Revolution, Performance Mouse MX and VX Revolution all found a spot on my desk at a given time … until I bought a drawing tablet … after that I only used the mouse for general tasks and no longer for my retouching work in PhotoShop … in came the trackball to replace the mouse.
I used the TrackMan Wheel both wired and wireless … in case of a trackball it stays stationary on your desk so you don’t have issues with the cable anymore, still I currently use the M570 Wireless Trackball from Logitech, a perfect companion for my drawing tablet and my brand new Logitech 510 … Gaming keyboard. That’s right, we’ve finally arrived at the topic of this article … using a Gaming Keyboard for professional post processing in Adobe PhotoShop … I know what you are thinking now : ‘are you kidding me, a gaming keyboard for PhotoShop … next thing you’ll be telling me to use a joystick right ?’ … well yes to be honest, but more on that later on.
There are a lot of custom made keyboards on the market to cater the gaming community, and despite being more expensive compared to regular office keyboards, they usually offer additional buttons … and most of them come with a cable instead of being wireless to avoid delays when you press a key … and more importantly to be able to ‘capture’ five keystrokes in one go … remember the ‘CTRL-ALT-SHIFT-F8’ I mentioned earlier?
As I have been really happy with my Logitech keyboards in the past I checked out their online store for a nice looking, and more importantly practical keyboard for my needs … I found the amazing G19 keyboard, looked impressive, color LCD display, a very nice feeling while typing (I went to a local store to ‘feel’ the keyboards before buying) but it only had 12 ‘Game keys’ (more on those later on) and cost a whopping €199.
Second option I found was the Logitech G510 Gaming Keyboard, priced at ‘only’ €120 it only had a monochrome LCD display … but it featured a total of 18 programmable Game keys … so this was the one I wanted to buy. Sometimes you just get lucky I guess, as I always registered all my Logitech gear I apparently became a VIP customer, hence I receive a mail from them from time to time … and while I was looking into buying this keyboard I received a mail with a nice discount … and free shipping if I ordered in their online shop.
Put in the order, made sure I selected the correct ‘AZERTY’ layout for me … and a few days later it arrived on my doorstep in a very oversized box with some ‘air bubble’ packing to protect the box of this brand new keyboard (some local shops didn’t even have the G510 in stock yet at that time) … if the keyboard isn’t impressive on his own, the packaging sure is, trust me.
Installing the G510 is easy and straightforward, in my case I just unplugged the USB receiver for the wireless MicroSoft keyboard I used at the time and plugged in the USB cable for the Logitech G510 (a rather long cable by the way) and powered up the PC. Instant recognition of the keyboard means the login works perfectly, after which you can install the drivers from the disc in the box, or as I usually do: go online and download the latest drivers from the site.
And now the fun begins … for starters you can actually change the color of the keys on this keyboard as it has light emitting keys, this also changes the backlit shade of the LCD display … might sound like a really nerdy thing, but it actually looks cool … until you get tired of it and change it to white anyway. The G510 also has the usual arrow keys in the typical ‘T’ shape, the usual ‘insert-home-pgup’ keys above them as we are used to on full size keyboards and a complete numerical keypad on the right and the row of ‘Function’ keys at the top … so far the standard layout.
The Logitech G510 also comes with ‘player’ buttons and a volume wheel above the numerical keypad, which comes in handy as I use to have some music playing when I’m programming … but the reason why I purchased this specific keyboard is the array of Game keys on the left : three sections of each six keys that can take just about any combination of key clicks to control my PhotoShop actions by hitting just one key ! This alone saves so much time I made back the price of the keyboard in a few weeks of post processing for customers … keep that in mind.
The software supplied by Logitech to setup these keys works very nice and isn’t too difficult to master, you select the ‘G-Key’, right-click and select from the menu what you would like this specific key to do … in most cases for me this would be a combination of key click like ‘CTRL-ALT-F8’ … but these keys can do so much more.
Let’s say you want to add a softlight layer over your photo, select black as the foreground color and select the ‘Fill’ tool in PhotoShop … you record an action in PhotoShop to create a new layer and change the blending mode to ‘soft light’ … assign a keystroke to this action (I used F9) … now hitting ‘d’ to select black as the foreground color isn’t recorded by the action … instead I record a ‘macro’ on my Logitech G-Key.
In this ‘macro’ I press the ‘F9’ key which executes the softlight layer action, subsequently I press ‘D’ and ‘G’ to set black as foreground (and white as background) color and select the ‘Fill’ tool … stop recording the macro.
I now only have to press one key that will add a layer on top of the one selected in PhotoShop, change to black and activate the ‘Fill’ tool all in one go … how’s that for time saving.
And that is one of my shortest actions I use, think about this one instead: when I open a photo in PhotoShop I always make sure my information and tags are added to the File Info including a copyright statement complete with link to my url on this matter … by setting this info I also remove the exif data from the image. This image will remain in high resolution for printing, so even if it still is an RGB file I want to have the AdobeRGB profile in this file (I have set this in my camera and in my RAW workflow, so normally I do not have to change the ICC profile in post processing).
But I have absolutely no intention of putting this high res 20mpixel image online for download, instead I use a smaller version that is published so the customer can view the image and decide to have it printed or select it for other purposes, so in comes one of my most elaborate workflows … completely automated naturally.
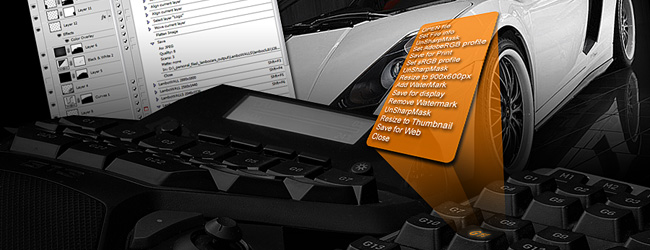
I open the original photo from my camera CF card and perform initial post processing on it, then I safe it using a recognizable name … and hit the G1 key on my Logitech G510 keyboard … which launches a massive PhotoShop action : Set FileInfo including copyright ‘Save as’ into a specific ‘for print’ folder Convert to sRGB profile Create websize version (usually 900x600 in my case) Add a ‘Watermark’ onto the photo ‘Save as’ into a specific ‘for web’ folder Remove the Watermark again Resize to Thumbnail format (150x100 in my case) ‘Safe for Web’ into a ‘thumbnail’ folder Close the file
Some of these steps actually include multiple commands, so the entire Action for the above is rather long, but it works perfectly, and only requires one key press when I’m done with the post processing to give me a print resolution version without watermark with the AdobeRGB profile, a web resolution version with my watermark and the sRGB ‘display’ profile to upload onto my server … and a small thumbnail to show online in the gallery for the customer or visitor to click on … which then displays the larger web resolution version.
 |
CPT Premium member BONUS : 60998 As a CPT Premium member you can download not only this article as an eBook but also included in the ZIP file are two templates for the Logitech G510 and G13 keyboards. |
Note : commercial use or publishing of our tutorials in any way, written or electronic, is strictly forbidden, we present these for your personal development only. None of our material may be published in any way without prior, written permission from the Car Photography Tutorials founder. All workflows and photographs are copyright protected and owned by the Car Photography Tutorials team unless stated otherwise
Advertisement
Become a MEMBER
Premium Membership
Become a CPT Premium Member and download all our tutorials including a PDF for printing and the result as a PSD file with layers if any.
Interesting articles
Adding authentic looking motion to still images
Sometimes you just have to get a sharp image of a car, but spinning wheels would be nice, we explain you how to achieve this in post processing.
Off camera flash car photography, part 1 of 2 : the shopping list
In this first part of the off camera flash tutorial I take you over the required equipment to get started using additional light sources.
Case study - Countach
In this specific case study we will take a look at how to remove unwanted clutter from the backdrop of a shot.
FAST TIP : a polar filter in car photography
In this tutorial I show you just how to use a polarization filter correctly and combine multiple layers together

Scale car photography explained in detail
In this article I guide you into scale car photography, from the preparation over the setup including lights, aperture, shutter speed and then taking the shot ... a lot of these tips can be used on full size cars too.
Keep up with CarPhotoTutorials
Why not follow us, become a fan, get our RSS feed or mail a link to a friend ?
![]()
![]()
![]()