USING ACTIONS TO ADD A WATERMARK TO YOUR PHOTOS

Canon EOS5D Mark II - Canon EF24-105mm f/4.0 L IS - 24mm 1/200 sec f5.6 ISO640
Advanced level tutorial by Mark
Why would you care to watermark your photo in the first place?
The reason is simple, the moment you publish a photo online it will get 'borrowed' at some moment in time ... I've seen photos published on my sites popping up all around the world after a few days or weeks, and naturally some cloned or cropped out my watermark.

But I still put a watermark on ALL the photos I put online, why you might ask?
Because if you are a professional photographer you will have a website showcasing your work, and people will admire your photos online ... while other will eventually 'borrow' them to use as their own, so don't make it too easy for them by not even putting a watermark on the shots.
Once you actually start selling photographs, this could be stock photography or shots you've taken during a car event and you offer them online for those that actually participated you want to make sure people are actually paying you for your time and effort ... so don't publish 1800x1200 shots without any source mentioned ... printing these up to A4 is quite easy, so do NOT make that mistake, you'll end up not selling any photos in the end. So only publish rather low-resolution images (I tend to go for 900x600 only) AND put a watermark on them.
You only photograph as a hobby and want to share your shots with friends and family ... but once your snapshot goes online there is no holding back for people with, let's say 'less than serious' intentions, so do put a watermark on EVERY image you publish on the internet.
Resize your photo before adding a watermark
It is best practice to make sure your photos are in the correct resolution to go online before you put your 'stamp' on it, so we'll discuss how to get the best possible result making your very high resolution photographs suitable to be uploaded onto a website.
Never put full resolution images online, if you really have to do so because your customer wants to download them instead of waiting for a DVD to arrive in the mail you should put them behind a password, never put high resolution photos publically online, they will end up in places you might never even think about, so avoid nasty surprises and keep full resolution images locally on your computer and use a low resolution version of the image to be sent out into the world.
Something about the pixel ratio
I know there are various pixel ratio models out there, just like there are widescreen monitors and regular monitors for instance. Now I've been using Canon DSLR from the first day in the business, my EOS350D had 3456x2304 pixels, the next step I got an EOS40D with 3888x2592 pixels, after that I upgraded to the EOS5D mark II full frame camera with a whopping 5616x3744 pixels and for track side use I got myself the EOS1D mark IV with 4896x3264 pixels ... note that even with the increase of resolution over the years the aspect ratio remained 3:2, which means any photo of either camera I owned can be downsized to 900x600 pixels to be published online.
I even did a quick check online about the Nikon D800, a massive 36.3 megapixel camera that delivers mammoth size photos holding 7360x4912 pixels in its FX format ... which as it happens also boils down to 900x600 for web use ... so instead of using the classic 800x600 (4:3) format I will show you how to work with a watermark formatted for a general 900x600 (3:2) image size.
The custom watermark
Now comes the time to decide just what you want to do in terms of adding a watermark to your photos, do you want to have a big, intruding logo all over your images, do you simply want a line of text with your name on each photo, you might like a bar added at the bottom of each shot, why not put a small signature on the image or perhaps the tiling trick appeals to you ... let's take a look at a few different approaches before setting the basics.
The big bad logo approach
Let me start by mentioning I really don't like to watermark photos with this method, but I also have to admit is does actually work, therefore I am going to show you how to set it up anyway. Remember those large C letter all over several stock photography files ? This is actually the 'copyright' symbol, and you can use it to some extent as a watermark, but I would put your name or website link on your photos too so people can determine where the image originated from.
I am not going to go into details how to create the big logo used for this watermark, I'm sure you already know how to impose some layers on top of each other so I'm only explaining how to go from design to usable pattern for watermarking.
We are looking at a large circle that covers most of our photograph, most likely to be put right at the center and holding some kind of copyright statement and our name and website link ... in the end it should look similar to this:

The trick to make this design work as a watermark is to create the circle and the text in white and lowering the opacity of the layers to about 50%. Because we also use the Bevel and Emboss and a 'Drop Shadow' layer effect we end up with grey and black shades, so this watermark will be visible on just about any color in the photo you overlay it onto, and that is what we are looking for right?

The above photo clearly shows that both black and white shades are nicely covered by the watermark, so this is a general-purpose overlay we can use on most of our photos anyway
But as I already stated at the start, I really don't like this kind of watermark on a photo, it just distracts too much from the car we are photographing here, so I tend to go for one of the less intrusive methods.
Tiles at work
If you don't want to have one massive 'stamp' all over your photos you could opt for a slightly different look, still covering most of the image, but this time a much smaller watermark that gets replicated all over the shot ... the tiling look.

The trick to get a tiling look is to create a watermark that is much smaller than 900x600 pixels, if you apply that one to a photo it will get duplicated several times until it covers the entire photo ... this way you can even use the same watermark no matter how large your photo is.
So to get this one started I would go for a 300x200 pixels canvas to create a watermark from, if you offset the logo or text on a nice grid it will be duplicated over the image very nicely:

If we apply this 300x200 watermark over a 900x600 pixels photo it will be duplicated 3 times in each direction, completely covering the image with these lines of text:

This tiling option will also make it very, very difficult to remove in post processing if people are trying to 'borrow' your photo, and I must admit it doesn't look as bad as the big circle in the middle of the shot, but still I don't really like this way of protecting a photograph either, but it is effective I have to admit.
The bottom line approach
I have been using this kind of watermark for a long time, with a few variations perhaps but it all comes down to the same thing, using a line of text, a small logo or a signature at the bottom of an image.
The original CarPhotoTutorials watermark was actually based on this method, we added a frame around the shots and some extra graphic items, but still it remained a kind of signature at the bottom of the photo:

This kind of framed watermark also makes sure you have a white (or black if you prefer that) surround with the photo, so even when shown on a black screen, the borders remain white, and by using a solid color frame you avoid having problems when your text is the same shade as the background in the image, that's why we've been using this frame ever since.
There is one serious downside to using a frame like this however, your photos will have to fit 'inside' the window that is left, and if the car in the photograph is close to the edge you get a bad looking result when applying this kind of watermark in an automated action:

So a frame might not be the perfect solution for every photo, naturally we can also use a smaller signature at one of the corners of the photo, either to the left or to the right, at the top or at the bottom, it all depends on your preferences.
Take a look at this bright orange signature added in the top right corner of every photo published on a model car collection site, it draws immediate attention but still allows the scale model itself to be admired without any interference:

The only possible issue we could have with this kind of watermark is the fact it can be rather easily removed in post processing, but that is just the way things go once you publish your photos online, they will be 'borrowed' at a certain moment, and most likely your signature will be removed from it ... but at least you can show there was malicious intent when they willingly cropped away or cloned out your watermark.
One of the most commonly used watermarks is a signature or logo of some kind in one of the corners, something like this professional photographer is doing using the exact same action we are putting together in this tutorial:

In all honestly, as much as we like our frame watermark, we must admit the small signature stamp is probably the best looking, less intrusive one we can advice to use, so we will talk you through all steps required to create this one, and once we have our watermark we'll show you how to automate it so you can 'tag' thousands of photos without manually opening any of them.
The foundation of any kind of watermark
Whatever style or type of watermark you are going to use, it all starts with the same step: creating a new document that should be the same size as the photos you will be publishing online ... in our case 900x600 pixels when in landscape orientation (more on that later)
So first point of business: create a new image in PhotoShop with these settings:

The name given to this new file isn't that important, but I would advice you to have a somewhat recognizable name, as we will be creating a 'pattern' from this file to be used as our watermark, the name for the pattern will be taken from the filename, so think about a name you will be able to remember.
I've put in a 300 dpi resolution, which is great for images destined for printing, but our watermark will go on photos to be published online, so why not use 72 dpi you might ask? Simple, when someone who isn't that into photography and digital images tries to print it, they will only get a very small printout on paper, anyway for display use this setting is irrelevant so you could put just about anything in there. I would however make sure the Color Mode is set at RGB Color at 8 bit and the Color Profile is sRGB ... this will make sense later on, trust me.
As I am going to use a white text for this watermark I first fill the entire image with a neutral grey shade (#808080) so I can see what I'm typing, now that our blank canvas is ready to use we will put a line of text on it, just press the"D" key on the keyboard to get black and white as foreground and background color, now hit the "X" to make white the foreground color and hit the 'T' key on the keyboard, select the font you like from the drop down list and make sure to get 'Right align text' activated:

Now I put the cursor near the bottom right corner of my blank canvas and start typing my initial line of text 'www.CarPhotoTutorials.com', by playing with different font size and putting '#AAAAAA' on the 'www.' and '.com' section we get a different look, now I just duplicate the text layer and transform it into a vertical mirror of the original text. Position it just below the original text and lower the opacity to 50%, apply a quick mask to it and paint with a soft black brush over the reflection to make it look more realistic.
Now select the original line of text again and lower the opacity to about 50% too and give it a nice drop shadow effect about 3 pixels away:

It might not look like much, but this has our name in it, and at the same time includes our url, without being too obvious, and with the nice reflection it doesn't look like a simple line of text but more like a signature of our website, which was the intention right from the start. And by using white with a lower opacity and a drop shadow this little watermark will be visible on just about every shade we impose it onto, another very important property of a good watermark.
Now we have to turn this into a pattern so we can use it to 'fill' a layer on top of the original photograph in an automated workflow, which is a lot easier than it sounds to be honest.
First make sure you make the background invisible just by clicking on the small 'eye' in the layers list.

Now go to the 'Edit' menu and select the 'Define pattern ...' option:

This will bring up a box where you can enter the name for your patter, I would suggest naming it something meaningful so you can recognize it later on when you have more than one pattern, I went for CPT_Watermark_900x600, that way I also know the resolution of the photos I can use this watermark on:

We now have our first watermark ready for use, but let's take our workflow one step further and create a similar one for portrait orientation, which is simple once the basics are done, all you have to do is modify the canvas size from 900x600 pixels to 600x900 pixels:

Just make sure you have the Anchor point in the position where the watermark sits, in this case the lower right corner, as we are working with a transparent background the Canvas extension color isn't important, but to keep it in sync with the layout I selected Gray here.
You will get a warning message stating the canvas will be changed, but that is exactly what I want in this case, so clicking 'ok' gives me a perfect 600x900 pixels, portrait oriented canvas ready for a second watermark to be distilled from, which I call 'CPT_Watermark_600x900' to make sure I don't get confused later on when I want to use it.
Just to make sure you are able to change this watermark later on I will would safe the file now, just call it anything you can remember like: 'CPT_Watermark' for instance.
Automating the watermark workflow
Time to make our life easier with a fully automated watermark workflow, in a matter of a few click I can downsize my original images, put the right sRGB Color profile into the shot, put a copyright statement into the metadata and stamp a watermark on the photo so it is ready to be published online.
Getting it all automated involves creating an Action in PhotoShop, and to make it easier to locate this action once it is ready to be deployed I make a new 'Action Set' that holds all my watermark actions together.
Creating the first watermark action
Our entire automated workflow to add a watermark to our photos begins with creating the initial action, and for that we will also create an entirely new action set in PhotoShop.
So hover to the 'Window' menu of PhotoShop and make sure the 'Actions' window is visible (shortcut key is alt-F9 by the way). Go to the Actions window and click on the toggle key at the right to unveil the specific menu on Actions, close to the top you'll notice two options 'New Action...' and 'New Set...'

Click on the 'NewSet...' option and call it 'CPT_Actions', this new set will hold the necessary actions to add a watermark to either a landscape or a portrait oriented photo, so now we can create a New Action that will put the watermark in place, but wait a minute before selecting this option.
Think about the fact we are intending to have this action put a watermark on hundreds of photos with as little manual intervention as possible, so before we actually start recording a new action we need to have a 'reference' photo open in PhotoShop, so select a photo you've made that you can downsize from full camera resolution to 900x600 and apply a watermark onto.
I opened one of the Geneva Auto Show photos I've made with my Canon EOS5D mark II, so this shot holds a massive 21,026,304 pixels (5616x3744) and has an AdobeRGB profile integrated during development of the RAW file:

With our 'reference shot' open in PhotoShop it is time to start recording our first watermark action, so head back to the action menu and select 'New Action', I call it 'CPT_Watermark_900x600' so I know exactly what it should be doing in the end.

You can dedicate a Function Key to your new action, but as I intend to use this one in a workflow there is no need to select one at this moment, so I just leave it at 'None' for this tutorial.
Remember once you press the 'Record' button just about everything you do in PhotoShop gets remembered in this action, so most of the time I put together a small 'screenplay' before actually recording my actions, however you can always modify a few things later one, but better to get it right in one take.
So first thing will be to perform a little 'UnSharp Mask' on this shot to bring out the details a bit more, I don't want to overdo the effect, so I use a 50% Amount for a 1 pixels Radius and a Threshold of 0 levels:

Now it is time to reduce the image to a more manageable size for online use, however I'm not going down to 900 pixels width at once, I will do this in three steps actually.
Most of my photos are rather large, so my first step in the downsize process usually takes it down to 3000 pixels wide (my oldest camera is a Canon 350D, which gives out 3456x2304 image files, so I'm safe with going 'down' to 3000 pixels), this will force PhotoShop to really calculate the remaining pixels.

After this downsize I do another 'UnSharp Mask' with the same settings as above and once again an 'Image Size' to 2000 pixels wide this time, followed by a third 'UnSharp Mask' process and a final 'Image Size' to the 900 pixels wide format I actually need ... usually I pull in a last 'UnSharp Mask' just to make the shot really pop, but keep an eye on the result, it might be too much, in that case you can do a 'Fade UnSharp Mark' from the 'Edit' menu to tone it down the 50%.
Note that all the time our action has been recording, so these six steps are now 'hardcoded' into the action for later use:

Note the red dot at the bottom: this means you are still recording, so lets go for the next step in our watermark action: converting our AdobeRGB profile we use for printing into sRGB for online use:

So now we have the correct Color Profile for web use, time to add a small note in the metadata of our photo using the 'File Info ...' option:

Just go to the first tab of the following screen and type in the Copyright section to show your information, this way it gets embedded into the image file:

Now the preparation of our photo is finished, and it is time to put our watermark on it, this requires an extra layer over the entire shot to hold the signature line in the end, so after going to 'Levels>New>Layer... you get this box:

Time to hit the 'G' button to activate the 'Fill Tool', make sure it is in the 'Paint Bucket Tool' mode and select 'Pattern Fill' and the correct 900x600 pattern to put over our photo:

And the result is just what we need, a nice sharp photo in a format that is perfect for online use, with the correct color profile integrated and even a nice little copyright notice ... and the reason you are reading this tutorial: a watermark signature.

Now you have two options to finalize this action, you either save this downsized image over the original one, something I would seriously discourage you to do however, or you save it in a dedicated folder or directory that holds the photos ready for upload ... which happens to be exactly what I use.
I know there are save options possible when you run the action in PhotoShop, but I tend to keep things nice and clean when it comes to preparing photos for upload to my website, hence I have an 'upload' folder that will keep all my photos for a certain project or customer together until I upload them, after that I clean the folder and leave it empty, ready for my next project.
So first I 'flatten' the photo so it only consists of a Background layer, which is perfect for the image to be saved as a JPEG file:

And now I use the 'Save As...' option so I can change the folder where the photo will reside without overwriting the original, full resolution photo in the process as I might need that one later on for printing or more post processing.

By selecting a different folder/directory in this Save As box we can direct the output from our watermark action into a special, prepared folder we will use to upload later on. It is however VERY important you do NOT change the file name, this way the action will use the document name to save in the new location and you do not overwrite the previous photo. If you would type in a new name here it would also be recorded in the action and the latter will use that same name for every photo you apply it to (if you don't change the settings in the Batch action), so not really what we were looking for here.
The final touch to this CPT_Watermark_900x600 action is performing a 'Close' action from within the File menu and pressing the 'Stop' button on the Action menu ... and we're done with our first watermark action for landscape-oriented photos:

So that is step one in our watermark action creation, now we do the entire flow again for a portrait-orientated photo. A quick recap to get this second action finished:
As our reference photo this time will be standing our 'Image Size' figures will be different, but the big lines of the workflow are the same:
Create a New Action : CPT_Watermark_600x900
Perform an UnSharp Mask (50%, 1px, 0 levels)
Image Size: but this time instead of the width going to 3000 pixels you need to set the height to 3000 pixels.
Second UnSharp Mask (50%, 1px, 0 levels)
Second Image Size setting the height to 2000 pixels
Third UnSharp Mask (50%, 1px, 0 levels)
Final Image Size setting a height of 900 pixels
Optional UnSharp Mask (depends on your preference, I usually tone it down 50% in Edit>Fade UnSharp Mask)
New layer
Select Paint Bucket fill with pattern set to CPT_Watermark_600x900
Fill the new layer with the 'portrait' watermark
Flatten the image
Save As into the dedicated 'Upload' folder/directory
Close the image
Press the 'Stop' action button
And we're done ... we now have two different actions that can add a watermark on either a 900x600 image or a 600x900 image (landscape or portrait orientation)
Making a difference between landscape and portrait orientation
When it comes to applying an action in Adobe PhotoShop to automatically add a watermark to your photographs it is very important to know if you picture is landscape oriented or portrait oriented, most cameras will deliver a 'standing' image when you use them rotated 90° counter clockwise (remember I advised you to get that battery grip with the extra shutter button on it? Now you know why you spend that extra money back then)
There are actually three options:
Turn of the 'automatic orientation' setting on the camera, this way all your photos will be 'landscape' oriented, you can rotate them manually in post processing anyway.
Select all the 'landscape oriented' shots in Adobe Bridge and run the corresponding Watermark action on them, subsequently select all the 'portrait oriented' shots and run a second Watermark action ... but that also involves manual work ... and we want to automate it all.
I would go for the third option to be honest: use a small script that selects the correct watermark action automatically depending on the actual orientation of the image.
Writing a script to determine the photo orientation
This can be done with a classic text editor, just type in the next lines of coding:
Var doc = activeDocument;
If(doc.width.value>doc.height.value) {
doAction ("CPT_Watermark_600x900", "CPT_Actions");
}else{
doAction("CPT_Watermark_900x600","CPT_Actions");
}
Now save these lines as 'watermarking.jsx' in the PhotoShop/presets/scripts folder found on your computer, do note that PhotoShop will pick up this script on start up only, so if you had it running while you created this file you'll have to quit PhotoShop and start it up again. (I specifically didn't want to make a screenshot of this script so you can actually just copy/paste them right from this page into your editor, avoids typos you know ... if you are a CPT member you can download this tutorial, the ZIP archive includes this watermarking.jsx file for your convenience)
A few things to keep in mind when using this script
Note that this script assumes a few things are available in your PhotoShop installation: You will have to create a new action set in PhotoShop and call it "CPT_Actions", keep in mind the capitals you are using, just to make sure it will work I would type it identically. The script uses one of two actions that have to be present too, either "CPT_Watermark_600x900" or "CPT_Watermark_900x600" ... so both have to be created with these exact names before we can use the script. I didn't include these actions with the tutorial as your folder/directory structure might not be the same as mine, so the Save As portion of both actions will most likely not work anyway.
Using the script to determine which action to use:
All you need to do is create another Action: 'CPT_Watermark' and select 'Insert Menu Item from the Action drop down menu:
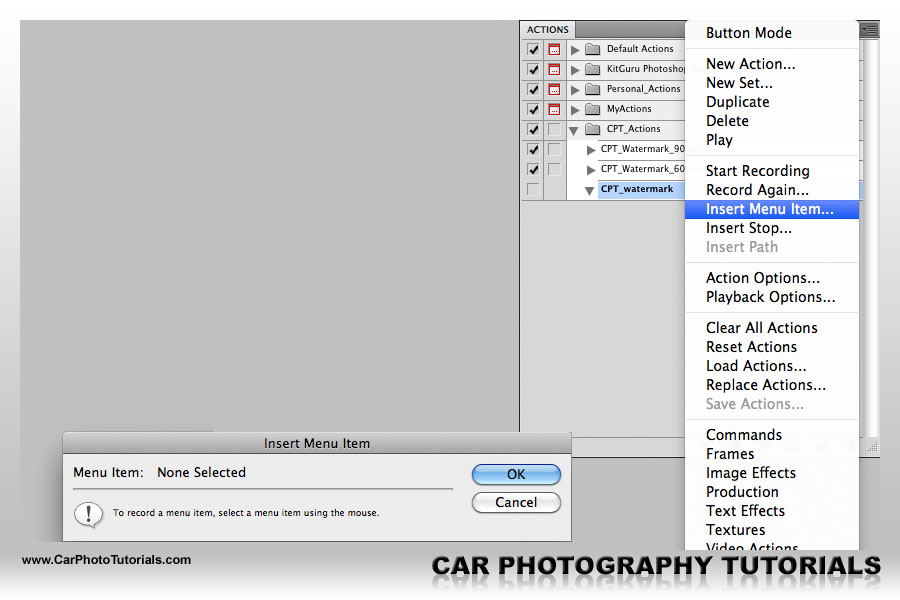
Go over to the 'File' menu, down to 'Scripts' and select the 'watermarking' script:
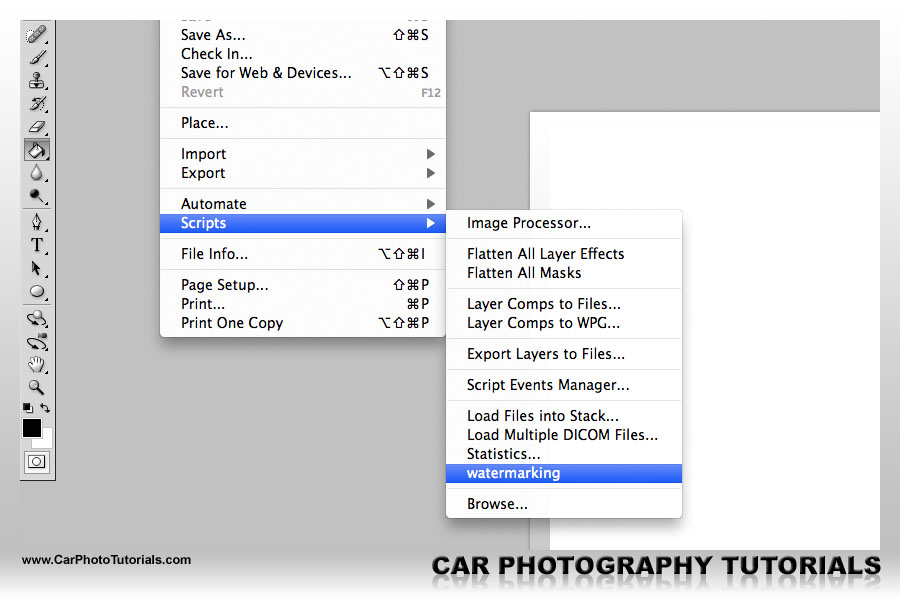
Click the 'OK' button on the "Insert Menu Item" dialog box and stop recording the action ... and we're done: all the required actions have been recorded and this last one will call the correct watermark adding action depending on the fact if the original file is in a landscape orientation or in a portrait orientation.
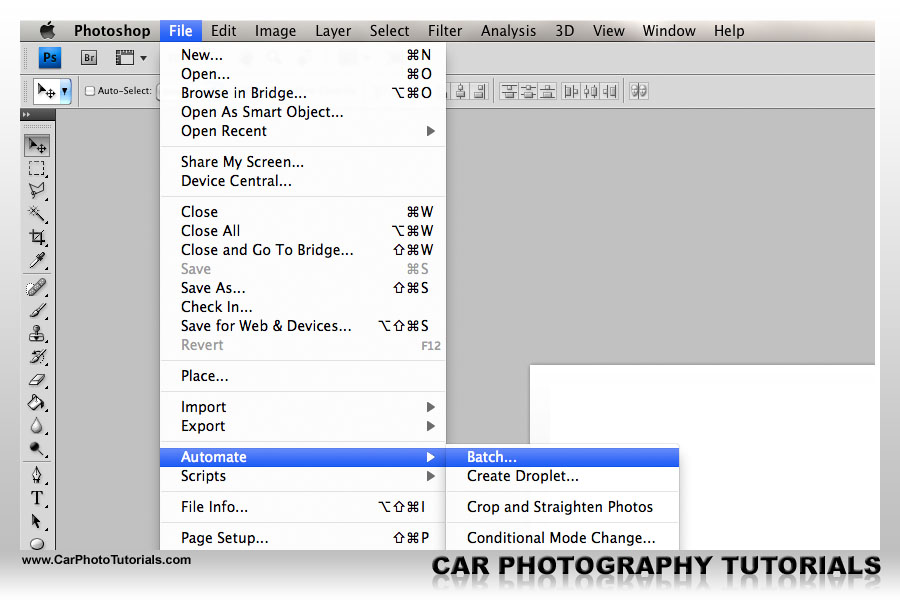
Putting all our hard work into action finally is easy, just have a folder/directory with your original photos ready, containing both landscape and portrait orientation versions and within PhotoShop, without having any file open select 'File>Automate>Batch...':
and dial in the following settings:
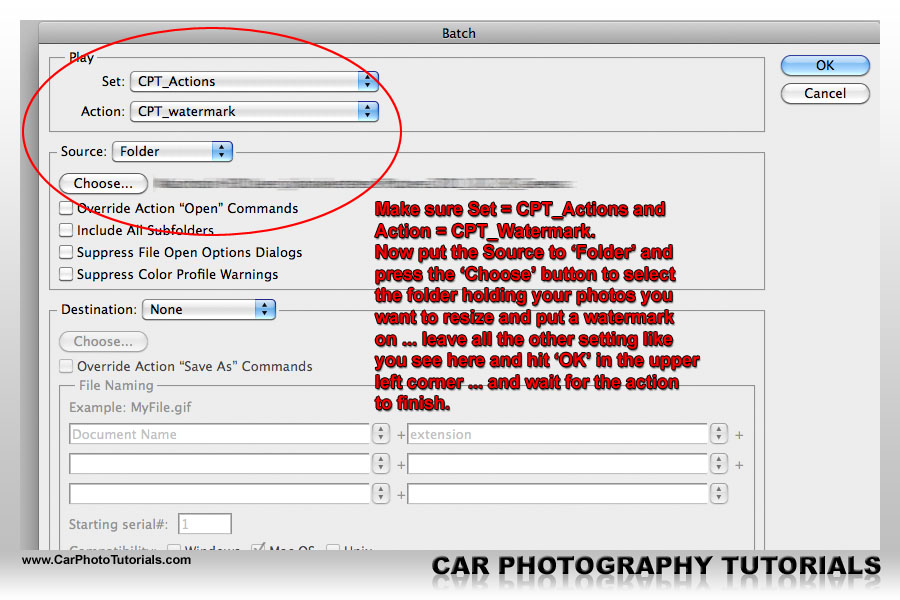
Select the CPT_Actions set, from that set select the 'CPT_Watermark' action, the one without any pixel resolution next to it, use a Folder as the source and choose which folder is holding your photos ... hit OK and sit back.
After a while all the photos present in the Source Folder will have been loaded into PhotoShop, downsized to 900x600 or 600x900 depending on the orientation and saved in a special 'Upload' folder without overwriting the original photos ... ready to transfer onto your website.
 |
CPT Premium member BONUS : 48239 This time we offer our members the option of downloading not only the tutorial text but also the script used in the action itself.. |
Note : commercial use or publishing of our tutorials in any way, written or electronic, is strictly forbidden, we present these for your personal development only. None of our material may be published in any way without prior, written permission from the Car Photography Tutorials founder. All workflows and photographs are copyright protected and owned by the Car Photography Tutorials team unless stated otherwise
Advertisement
Become a MEMBER
Premium Membership
Become a CPT Premium Member and download all our tutorials including a PDF for printing and the result as a PSD file with layers if any.
Interesting articles

DOF - Depth of Field
In this article we take a look at the different aperture settings you can use while photographing cars, setting your DOF can create some amazing effects.

Scale car photography explained in detail
In this article I guide you into scale car photography, from the preparation over the setup including lights, aperture, shutter speed and then taking the shot ... a lot of these tips can be used on full size cars too.

Case study - DOF, Depth of Field
This shot was taken while the black Ginetta was leaving the pit lane at a famous circuit in Belgium, it looked good straight out of the camera, but a little bit of tweaking made it perfect.

Car photography that sells the car
Selling a high performance car isn't easy, but as they say : a picture speaks a thousand words. We'll show you how to get the winning shot that will sell the car quickly by selecting the correct background and perform the right post processing.

Photographing a major motorsport event
Motorsport like car races are always very interesting events to capture as an automotive photographer, we explain how to make the best of your experience.
Keep up with CarPhotoTutorials
Why not follow us, become a fan, get our RSS feed or mail a link to a friend ?
![]()
![]()
![]()