DOF - DEPTH OF FIELD
Canon EOS 40D - Canon EF-S17-55mm f/2.8 IS USM - 55mm 1/125 f5.6 ISO 1600
Basic level tutorial by Johan
DOF is a term often used in portrait and landscape photography, it actually determines how much of your image is in focus.
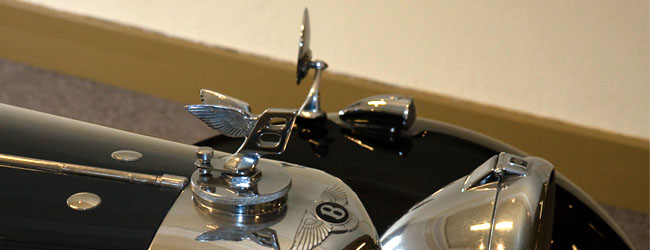
If you take a look at the heading photograph you'll notice the Flying B on this classic Bentley is sharp while the fender in the background is out of focus, also called background blur. This effect can be reached by controlling the aperture setting on your lens creating the DOF, or Depth of Field you want on that specific image.
When you focus your shot on an object you will actually have a certain amount of space in front of, and to the rear of this object that will be sharp, while items closer or further away will be blurred ... this is the depth of field that is controlled by the aperture setting on your camera.
Depth of field in an image doesn't go from sharp to blur abruptly, it graduates slowly into both extremes, which makes the final shot very pleasant to look at, the background blur or out of focus part of the image is sometimes also called bokeh, so if you encounter this term you know they are actually talking about the DOF.
Different aperture settings create a narrow or a wide depth of field in your image, which one you should use depends on what you expect from your final image, we'll go over both settings with a few examples :
Narrow Depth of Field
 This image of a Jaguar clearly shows what can be done by using a shallow DOF setting, we still went with f/5.6 for this shot which was taken at 55mm, but because we were so close to the 'cat' we couldn't go for f/2.8 because in that case it wouldn't be sharp from front to rear.
By setting the aperture to 5.6 the entire Jaguar was sharp while the rest of the car and more importantly the background would be completely out of focus, making the main object in our composition really stand out, which is what matters when playing with the aperture setting.
This image of a Jaguar clearly shows what can be done by using a shallow DOF setting, we still went with f/5.6 for this shot which was taken at 55mm, but because we were so close to the 'cat' we couldn't go for f/2.8 because in that case it wouldn't be sharp from front to rear.
By setting the aperture to 5.6 the entire Jaguar was sharp while the rest of the car and more importantly the background would be completely out of focus, making the main object in our composition really stand out, which is what matters when playing with the aperture setting.
Because only the jumping Jaguar is sharp the viewer's eye is automatically drawn to it, the background is out of focus, so it doesn't draw attention, which is exactly what we meant with this image, if we really wanted to remove all distraction from the background we could remove the red and tan color from it, possibly turning it into grayscale, that way the image would totally focus on the 'Cat'.
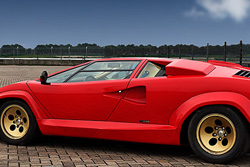
 You can't always use a large aperture setting when shooting cars, this orange metallic Lamborghini for instance was shot at f/5.6, but as you can see the front wheel isn't sharp, this is because we needed at least f/8.0 to get this shot right.
The exact aperture setting depends on a few different factors, one is the focal length of the lens used, secondly the distance to the object you are shooting and thirdly how much of the object you would like to have in focus ... you can actually calculate the DOF based on these settings by using DOFMaster, an online DOF calculator based on your specific camera model, the focal length, f-stop and distance to your subject.
Another option is a DOF card, this is a cardboard or plastic disc that can be turned to obtain the focal length and f-stop value, the result will show you how much depth of field your resulting photograph will have, a nice little help when you would like to get some of these special effect while in the field.
 There is a risk in this kind of photography, take a look at the shot of the steering wheel on the left, you'll notice that the switches are nicely in focus, while the dials and more importantly the Raging Bull emblem on the steering wheel are out of focus, this happened because we put our focus on the wrong area in this shot, we should have put it on the logo of the steering wheel and then re-composed the shot to get this look.
Sadly we can't give you a definite setting for your aperture that will work for all your shots, it all depends on the photo you are taking and what impression you would like to give with the final result. One advice we can give you, put the camera in Aperture Priority when you are just starting and dial in a value of f/8.0, this will ensure you that the entire car is tack sharp in your image most of the time.
Wide Depth of Field
Setting a small aperture will give you a much wider depth of field in your shot, this is especially useful when you want to take a group shot of several cars, or when you are shooting scale cars, the latter requires some special skills we will discuss in our Photographing Scale cars tutorial.
 If you are shooting a group of cars like the one on the left here you should turn to a smaller aperture setting by increasing the f-stop on your camera, this will make sure all the cars in the shot are tack sharp. If you would shoot this with an f-value of 2.8 only the yellow car would be sharp, the rest of the group would start to go into background blur.
The downside of using a small aperture is that you will need a longer shutter time to allow enough light onto your sensor, this shot was taken at 1/320 with an ISO setting of 200 because it was a cloudy day in July, we could have used a wider DOF on this shot as our shutter speed still had some margin before we would be needing a tripod, however always try to keep it at 1/125 when shooting up to 55mm, this way you'll be able to avoid camera shake.
Up to a certain point an IS lens can safe the day when your shutter speed drops, but don't expect it to magically get every shot right, after all there is no substitute for a decent tripod, once you get more advanced in automotive photography you'll have to add one to your gear anyway.
 Shooting scale cars is a totally different ballgame, even with very small aperture setting you will get out of focus shots, take a look at the black car on the right, we've put our focus in the steering wheel, as you can see even an f-value of 22.0 couldn't manage to get everything sharp in this shot, the rear wheel is totally blurred.
This is a normal shot, you will have severe difficulties getting everything tack sharp in this kind of photography, granted we didn't use a true macro lens, but even this telephoto zoom lens is able to get such shots as it can focus as close as 1.4m, which is needed when shooting 1/18 scale models like this one.
With such an extreme f-setting you are bound to be using a very good tripod, exposure time was a full four seconds for this shot, no IS or Vibration Reduction will be able to get this right, only a sturdy tripod and a remote shutter can deliver this kind of sharpness.
Actually using DOF to your advantage
Once you get the hang of things you will be able to use the depth of field limitations to your advantage, getting the aperture right in a shot will mean that your main subject is nicely isolated from the background, the only problem with cars is that they are so big compared to shooting portraits.
So the car should be far away from it's background to get the car sharp and the background blurred, most of the time this isn't even possible when doing a three quarter shot of it as you'll need enough DOF to get the entire car sharp anyway, when you do a full side shot things tend to ease up considerably.
 This white Porsche was shot during a gathering on a circuit, we've deliberately set the aperture to only 5.6 for this shot to get a small amount of background blur on the rather unattractive surroundings for this car, this was probably the lowest possible value as the rear wheel and rear wing were already getting slightly blurred.
A much better option would have been to use a telephoto lens for this shot, the distance we would have to take from the car coupled to the focal length would result in a much more pronounced background blur while still keeping the car in focus, however as this was a public meeting the risk of people walking into the frame made this next to impossible to achieve.
 This is a really nice action shot, this black Ginetta was just leaving the pit lane to put some laps on the track when we've shot it, because we had our aperture set at only f/4.0 the DOF was very narrow, the cars and people in the background were nicely out of focus making the Ginetta stand out extremely well in this shot, the owner of the car really loved this image by the way.
We did add a little tweaking to the top this shot to have the car stand out even further, however the DOF came straight out of the camera like this, we've added a Case Study for this image so you can take a look at just what we've done to make this shot worthy of having it framed and put on the wall in the owner's office.
 When you want to cover a race during bad weather you have two options, either bump up the ISO with the risk of getting noise or use a larger aperture ... both will give you the option of using a faster shutter speed, this red and white race car was shot at f/4.0 because we needed 1/320 to make this shot work, the cars were thundering towards us at very high speeds here, hence the rather fast shutter time.
These conditions are were those very expensive, fast lenses come in handy, at times you just need an f/2.8 aperture to get the shot you need. In this particular shot the wet track gave us a nice reflection of the headlights in front of the car while a second car was nicely blurred in the background, we captured the action in this shot perfectly.
 Another trick to use a large aperture correctly is to pull the viewer's attention to something in particular, for the yellow Lamborghini Miura from the late Sixties shown on the right we put the focus on the original mirror that was mounted on the fender. This particular car was one of only two Miura SV ever imported into the country and the owner was very proud of the fact that it was the only one with the original factory mirrors from that period.
When you get more experienced in photographing cars you will start to shoot with a larger aperture to get that special effect you want, you will probably not get it right from the start, but practice makes perfect right ? Remember you are working with a digital SLR, so take a few shots with different aperture settings, you can evaluate them afterwards on your computer and delete those that you don't like.
 |
CPT Premium member BONUS : 57032 If you would like to print the Depth of Field article you can download our special PDF which is optimized for hardcopy layout. |
Note : commercial use or publishing of our tutorials in any way, written or electronic, is strictly forbidden, we present these for your personal development only. None of our material may be published in any way without prior, written permission from the Car Photography Tutorials founder. All workflows and photographs are copyright protected and owned by the Car Photography Tutorials team unless stated otherwise
Advertisement
Become a MEMBER
Premium Membership
Become a CPT Premium Member and download all our tutorials including a PDF for printing and the result as a PSD file with layers if any.
Interesting articles
FAST TIP : a polar filter in car photography
In this tutorial I show you just how to use a polarization filter correctly and combine multiple layers together
Race photography, a day at the track
You must admit that being track side must appeal to you, but it takes some technique to get the best shots from that position, we explain how to get it right.
Off camera flash car photography, part 1 of 2 : the shopping list
In this first part of the off camera flash tutorial I take you over the required equipment to get started using additional light sources.
Case study - Countach
In this specific case study we will take a look at how to remove unwanted clutter from the backdrop of a shot.
Filters in the digital age
On a forum you might have red a discussion about using filters before, is it necessary or not ? We give you some tips.
Keep up with CarPhotoTutorials
Why not follow us, become a fan, get our RSS feed or mail a link to a friend ?
![]()
![]()
![]()