ACTION PHOTOGRAPHY USING A CAR RIG WITH SUCTION CUPS
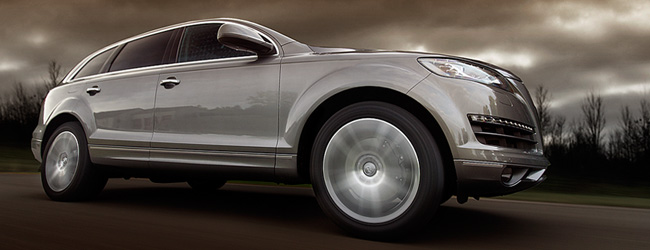
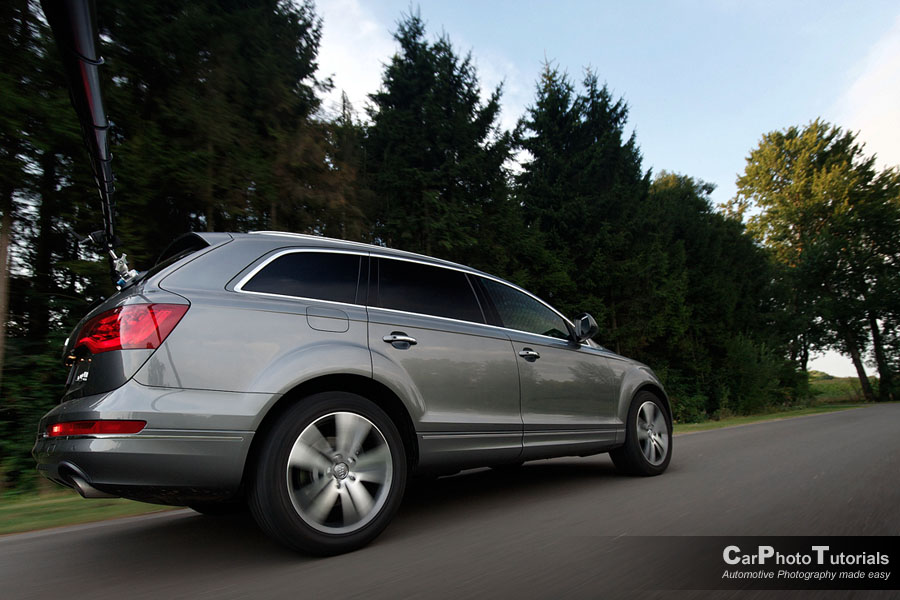
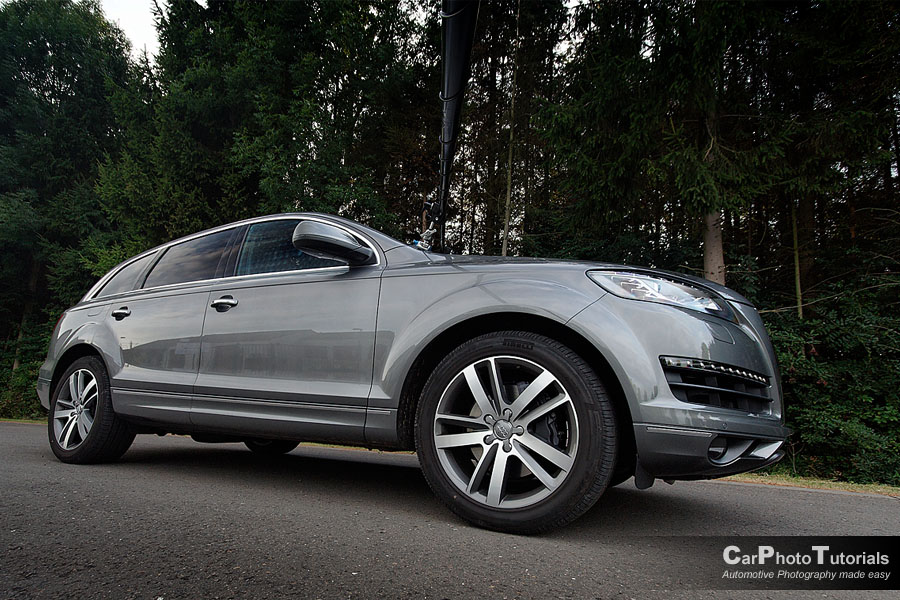
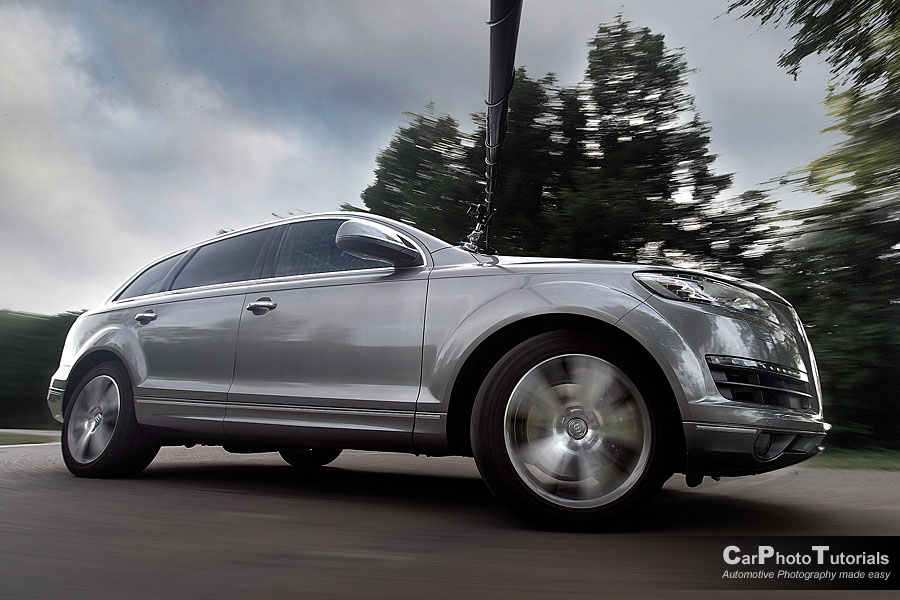
Canon EOS350D - Canon EF-S10-22mm f/3.5-4.5 - 10mm 1/15 sec f6.3 ISO100
Advanced level tutorial by Mark
DISCLAIMER this tutorial shows you how to perform a rolling rig shot using a boom and suction cups, in now way can I be held responsible for any damage to you, other people, the car, other cars or the equipment as a result of following the tips mentioned in this tutorial. If you are attempting any kind of rig shot you take full responsibility for any damages you might inflict on the car, surrounding cars, yourself or your equipment.
Many people have been asking for a tutorial on RIG photography, and to be honest I have always tried to keep away from this kind of photography for one major reason: it is dangerous, plain and simple. Both for you, for the car you are photographing and for your equipment ... so please think about this before you venture into rig photography, make sure you check everything before you start rolling or driving the car ... double check, and even triple check everything ... the suction cups, the grips, the camera ... verify it all is fixed tightly before attempting any rolling photo.
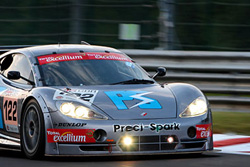
Rig shots convey a sense of speed and motion
When you see an action shot of a car there are a few possible methods on how it has been created, one of them is using a 'rig' ... which is nothing more than a long pole (or boom) that is fixed in one way or another onto a car with a camera hanging from it on the other side. A method that has been in use for ages already, but it is not for the faint at heart ... rig shots are dangerous, there is no other way to put it.
In this tutorial I will explain how I used to do rig shots like this ... but only if the customer really needed this kind of photography, and always after they sign a waiver, taking all responsibility for any damages, and trust me, it will go wrong at one point ... remember Murphy's Law: 'Anything that can go wrong, will go wrong'. I can tell you right now you will have a suction cup coming off or a clamp loosing grip ... or even worse have your camera falling to the ground during the shot ... so not only double check everything, but triple check it all!
Rig shot essentials
Rig shot photography isn't just dangerous, if you want to do it right it is also expensive, before even attempting your first rolling rig shot you have to spend some money to get the essential parts you'll be using, and I just want to inform you on which I use ... and which you should NOT use.
The big 'no no' cups

If you are considering to do rig shots on a regular basis I would avoid stuff from the local DIY shop. Sure those orange 'double' clamps look good, and they do stay in place rather well, I even saw some with three of these cups ... but trust me, they will loose grip and have your boom hitting the car and your camera being dragged over the pavement ... just don't make this very costly mistake, it isn't worth it, trust me.
I know the above statement will cause some reaction from people using these DIY clamps, and sure they can withstand a lot of pulling power, but I have three serious issues with them: for one you have absolutely no idea how much vacuum you've pulled by lowering the levers, more importantly if you are loosing vacuum. Secondly they have no protection on the suction cups, so you'll have to make sure they are meticulously cleaned before applying them onto a $15k paint job to avoid scratches ... and last but not least ... you aren't conveying a sense of professionalism with these, which can be important if you attach them onto a $500,000 Lamborghini that just left the showroom floor.
The eBay clamp

Photography equipment is expensive, and I also bought a lot of material from overseas, some expensive and some low cost just to see how they hold up against their original 'make' counterparts ... and most of the time I've been pleasantly surprised, despite the fact they only cost one fourth or even less they tend to work just fine ... if you use them for what they've been intended for.
And this clamp is a perfect example of my statement, I got it from the UK and it costs next to nothing, comes with rubber protection on the clamp, a very stiff spring to hold the clamp shut and a nice, albeit little ball head that allows the tripod size screw to be mounted in just about any angle you can imagine ... but I would NOT put a DSLR onto this clamp, it will not hold it. I use it to mount a remote flash on it for an indoor shoot ... and that is what small clamps like this are meant for, not to hold a heavy camera on a rolling car.
The Avenger Pump Cup
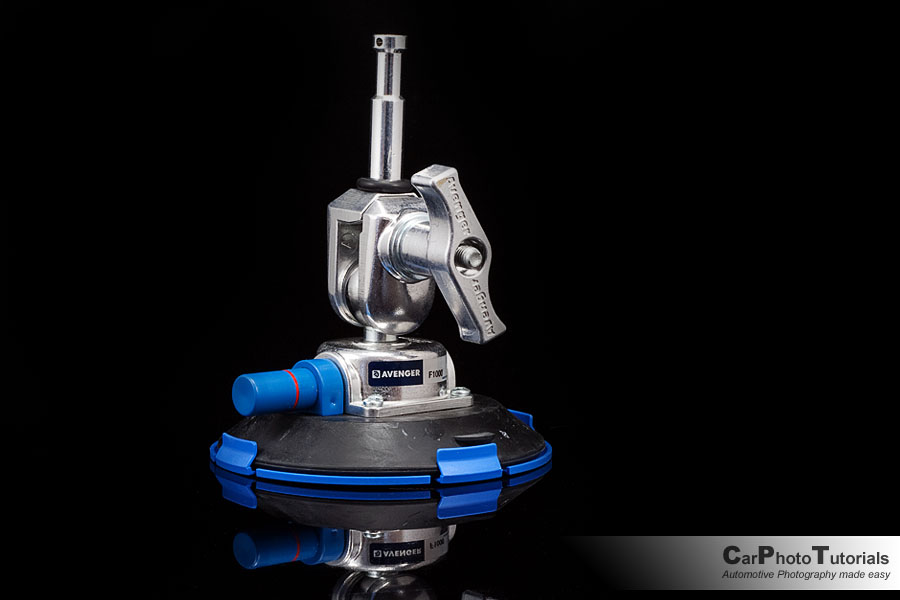
Meet the Avenger F1000 Pump Cup with swivel pin ... it will set you back up to $100 a piece, but this is the suction cup to get if you are serious about this kind of rig photography. The black cup itself has a nice large diameter of 15cm (5.8 inch) and comes with a protection during transport, you'll still have to clean it on site, but at least it has not been in contact with dirt or sand. The Avenger comes with a ball joint so you can have the pin at the top point in 'almost' any direction, but the most important feature for me is the pump action.
Take a look at the blue section, the pump handle shows a red line ... when you mount this cup onto a car (I will go into detail later on) you start 'pumping' the air out of the cup by pressing this blue pin ... after a while you'll have created a decent vacuum underneath the cup and the red line will no longer show ... as long as the red line is invisible the cup stays in place, once vacuum has gone beyond a certain 'danger point' the red line become visible again and you can pump it up a little more.
The Super Clamp from Manfrotto
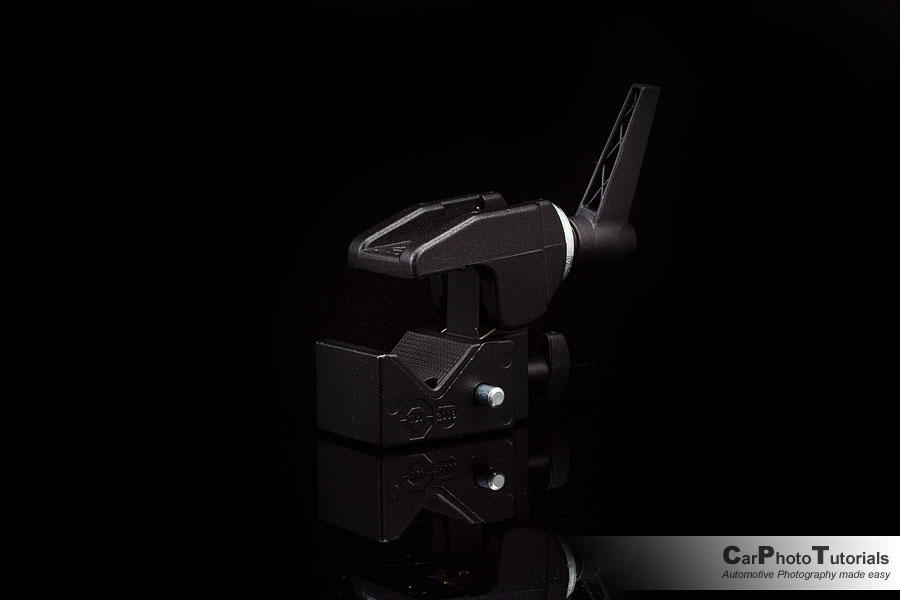
To make sure you are gripping the boom of your rig in the right way I would advice you to get the Manfrotto 035RL Super Clamp, sure they are big and heavy, but they are made to hold heavy equipment onto round or square tubes (they come with an adapter you can fit for square tubes), once again these aren't the cheapest out there, and I'm sure you'll be able to find some 'replica' units online, but I try not to take any risks with my equipment so I ordered these for my automotive rig.
Keep in mind you will need at least three of these Super Clamps, two will be mounted on two Avenger F1000 Cups and the third one will receive a ball head to mount the camera on at the other side of the pole.
The Ball head mount
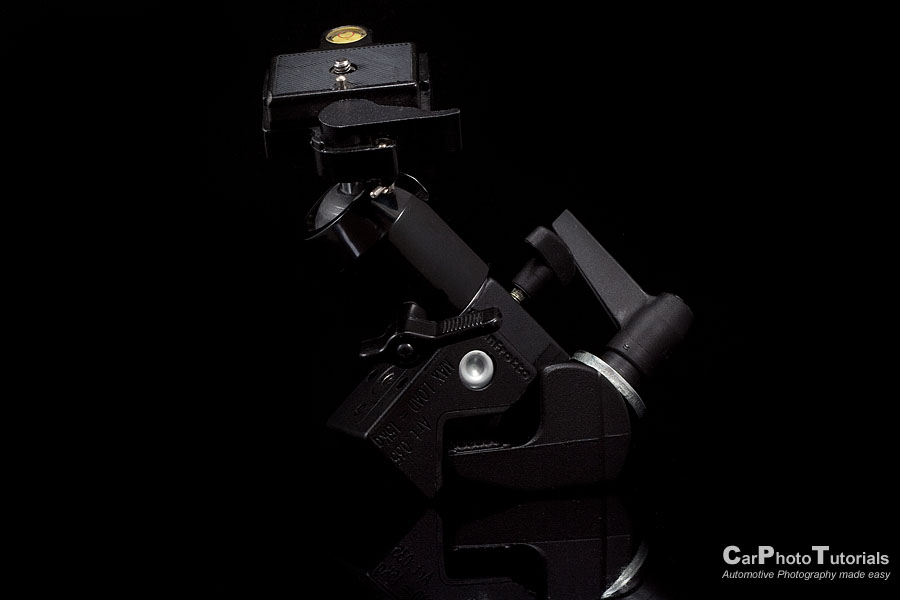
You could mount the camera directly onto the screw delivered with the Super Clamps, but that would seriously limit the amount of adjustability for your rig setup, so either you buy the expensive 'Manfrotto Magic Arm' ... or as I did, at least a nice ball head mount as I found my use to warrant getting the Magic Arm too limited.
When you buy the Super Clamps I mentioned earlier you also get a nice 'bolt' that fits right into the bottom of the Ball head mount as can be seen on the photo, this allows you to 'clamp' the mount straight onto the pole and adjust the angle perfectly to have the car in the viewfinder, the fully adjustable Magic Arm from Manfrotto allows a lot more play ... but at a price naturally, so I leave the decision to buy one totally up to you.
The entire 'mount' set
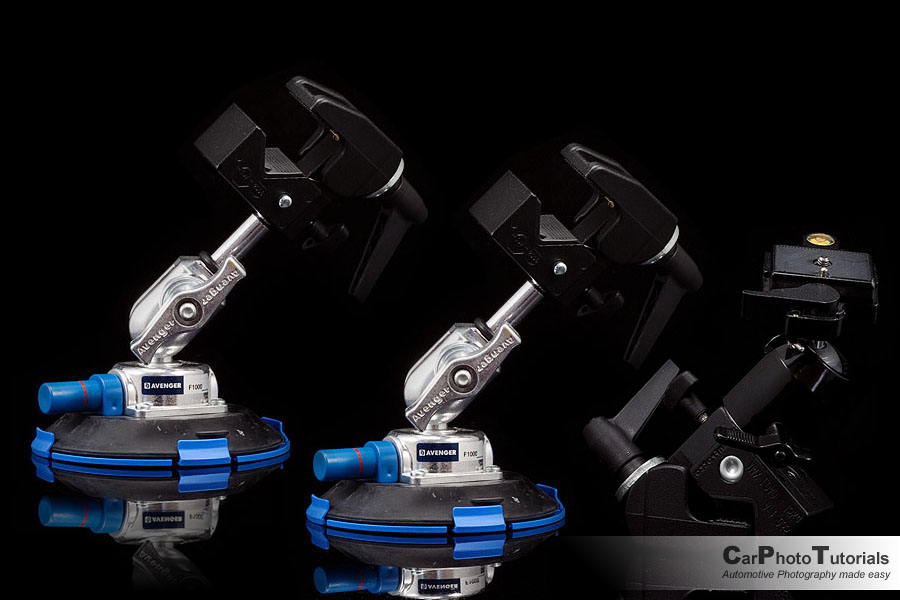
So what's in the carrying case for my rig setup? In fact you'll need at least two suction cups, three might leave you some more room to play and have a more rigid fixture, but adding a third one onto a car can be rather difficult, so I only use two of them.
Each of the suction cups receives a Super Clamp and you'll need a third one for the camera mount on the other end of the pole, so in total three Super Clamps ... you have the option of getting the Magic Arm or just go for a Ball head mount like I did ... in the end we are already talking about $400 in total, and we still have to get the boom itself.
The boom, or pole

I have a boom in sections as I feel it is more stable than an adjustable length boom, in fact I have four sections of about 1 meter in length, the one seen on this photo is made from three of these sections so in total about 3 meters long.
Also note I put the suction cups on the rear window ... I tend to avoid putting these cups on bodypanels, for one these are painted so that could mean scratches on the paint, and secondly the layered glass used on cars these days is much stronger than the metal body.
I put the two suction cups at such an angle to each other the pole is actually pointing down, I also have the ball head mount 'upside down' on the pole, this means the camera will be hanging very low to the ground, make sure it will not touch the ground when the boom 'flexes' ... having the camera hanging like this will mean the pole will be much easier to remove in post processing too as it will not be in the way of the camera when it takes a shot of the car.
The first rig shoot
So we'll put it all together for our first rig shoot. I always bring along a bottle of water and two microfiber cloths, the suction cups have a protection during transportation, but I always clean them thoroughly with water before I apply them onto the car, and while I'm at it I also clean the spot where I'm putting these cups ... this will avoid any scratching from dust or sand particles to a certain degree.
Once the cups have been 'pumped' to a vacuum where the red line is invisible I add the Super Clamps onto them and position them roughly in the same direction, I then mount the boom to the length required, in this case I went for 3 meters, after which I carefully insert the boom into the two clamps having one clamp at the end with the second somewhere along the boom ... this leaves a lot of length just hanging beyond the side of the car.
Always tighten the clamp near the middle of the boom first, and I have the opening of the clamps pointing upward so the boom actually rests into them, this avoids the boom from dropping from the clamps while you mount them, if you have a partner or a friend to assist you things are a lot easier but I tend to work alone.
Next up is adding the clamp at the other end of the boom to hang the camera from, as mentioned I tend to hang the camera upside down so it 'rides' very low to the ground, resulting in a very nice angle of your photograph, just keep in mind every boom will flex a little ... so keep the camera high enough so it won't touch the ground while the car is moving.
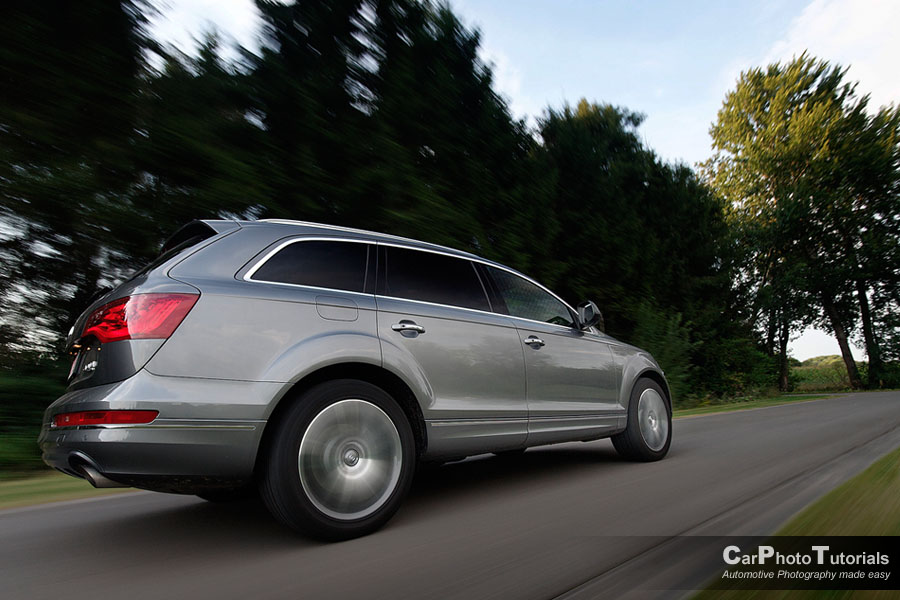
If you are doing this for the first time you might be struggling a bit with the shutter speed, you have to get a long enough shutter to have the wheels spinning nicely, take a look at the first shot at 1/30 sec ... the wheels do spin, but I felt it needed some more spin so I lowered the shutter speed to 1/15 sec ... naturally this meant I also had to change the aperture to 6.3 from 4.5 to keep the amount of light hitting the sensor more or less the same.
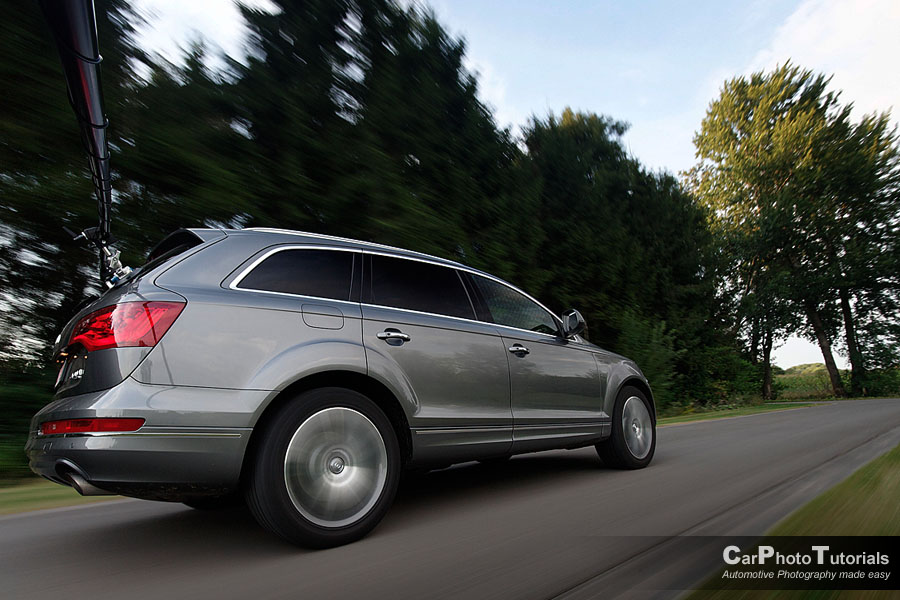
The second shot
Let me give you another piece of advice, especially if you have a boom that tends to flex a lot during the shot you might want to use this little trick.
Take an exposure while standing still. This will give you a photo with the car being perfectly sharp in the exposure, after that you can take a long shutter shot and actually paste in the 'still' into the rolling shot ... you'll have a nicely blurred background and a perfectly sharp car in the end.
This does take some serious post processing and masking, but so does every rig shot in fact. You will always have to clone out the boom from your photo, and that can sometimes be rather difficult, it all depends on where you see the reflection of the boom on the car, that is why I 'hang' the camera on the boom, that way the entire boom is above the car in the shot so you only have to deal with the reflection.

Just like on our first attempt I start with a nice shutter speed of 1/30, but again the wheel spin isn't up to specs for my taste so I lower it to 1/15 and perform a second run ... with the desired wheel spin I was looking for, this is the shot I will be post processing further when I get back in the office.
These photos have been taking using a wired remote shutter controller with a 10m extension cord wrapped around the pole, as the camera is hanging on the extremity of the boom I can not reach the shutter button to press it for an exposure, and even if I could reach the camera it would cause way too much camera shake and ruin the entire rig shot anyway.
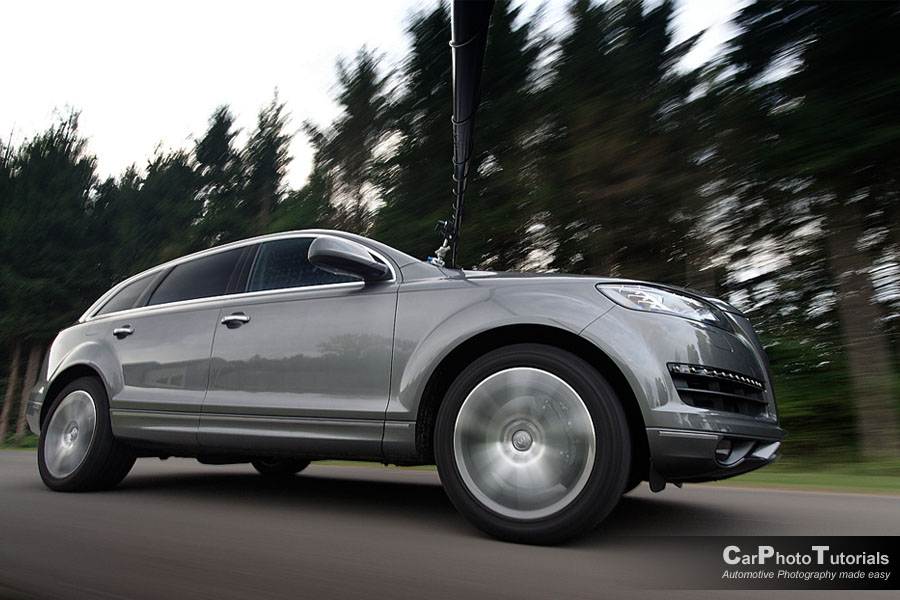
As I am doing these rig shots on my own I am actually driving the car slowly while I take an exposure, that is why you are seeing shutter speeds of 1/15 second ... but there is another way.
If you can have some assistance you could do even more extreme rolling shots with very long shutter times, up to several seconds in fact, which results in totally amazing wheel spin. This involves activating an exposure and subsequently manually push the car forward ... or backward, you'll never notice this in the photo anyway.
Because you are exposing for several seconds you can carefully push the car very slowly, hence avoiding any flex in your boom if you've selected a nice flat stretch of road ... this kind of rig photography is often done in parking lots or on private property ... in fact you are not allowed to do any king of rig photography on the open road ... way too dangerous!
Multi second exposures
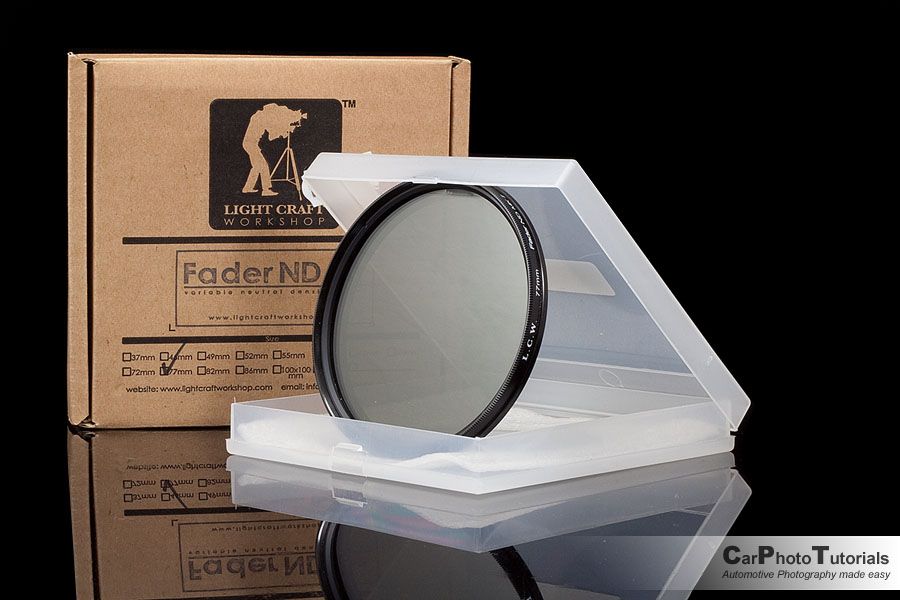
There is however one serious problem if you want to do multi second exposures in rig photography while you push the car ... there will be too much light and the photo will be over exposed, so you will need an ND filter, a Neutral Density filter that effectively blocks light from reaching the sensor in your camera.
And here things get a bit difficult, you could buy different ND filters depending on the amount of light you want to 'cut', they range from less than one stop to one stop, two stops ... even as much as ten stops ... or you take my advice and buy the 'Variable Neutral Density' filter from LCW, Light Craft Workshop which can change the amount of light that gets blocked depending on your needs at that specific setting, it might be a little more expensive at first, but it will avoid 'stacking' filters to reach the effect required ... and I can only say: less filters in front of your lens will result in better photos.
Effect filters
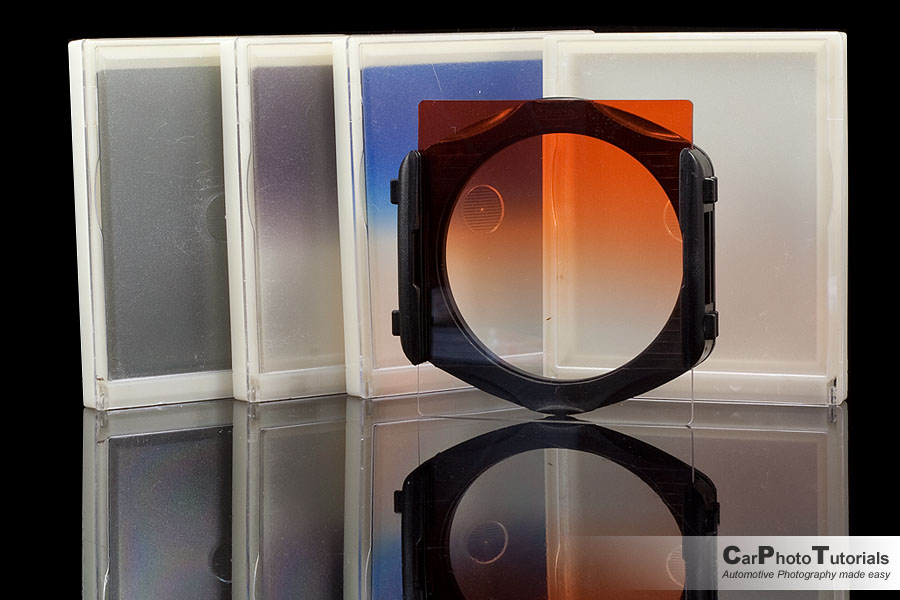
I bought these slide-in or slot-in filters as they are sometimes called just to check them out, this system has been around for ages, ever since the 'film' days when it would be more difficult to achieve their effect during processing, so I wanted to try them.
These involve putting a plastic holder in front of your lens and selecting the filter you want to use ... and simply slide it in front of the lens. I bought a one stop ND filter and three gradient filters ... one with a one stop ND fading out to zero, one with a blue gradient to intensify the sky and one with an orange gradient to get that special CSI Miami look.
I imagined I could use these filters for my rig shots to get some special effects right from the start ... so do they work? They actually do work, but I have to be honest here ... I can get much better effects in post processing, so I no longer use them these days.
Adding even more drama
A rolling rig shot looks very dynamic when executed correctly, but there is a way to add even more drama to the shot ... just do an exposure while taking a corner. This will create such an amazing look and feel in the shot, the entire blur gets a circular direction and with the front wheel being at an angle the shot just oozes speed from every pixel.
In fact there are a few angles that look really good for rig photography, the low angle three quarter rear shot like the first one I mentioned, a similar low angle front three quarter shot like the second exposure ... but the low front angle while taking a turn does take the cake if you ask me, it really adds so much more dynamics to the shot ... but there is another angle that really works well on a rig shot ... the full side shot.
The only problem with a full side shot is the fact you will need a very long boom to get the entire car in the photo, keeping in mind you'll need some space at the rear of the car and a bit more space in front of the car to keep the Rule of Thirds in your photo ... so not too many people have the equipment to create full side rolling shots with a rig ... you might want to use another method: the follow car, a second car driving next to the one you are photographing ... but that has nothing to do with rig photography so I will not go any further into that right now.
Post processing - Step by step
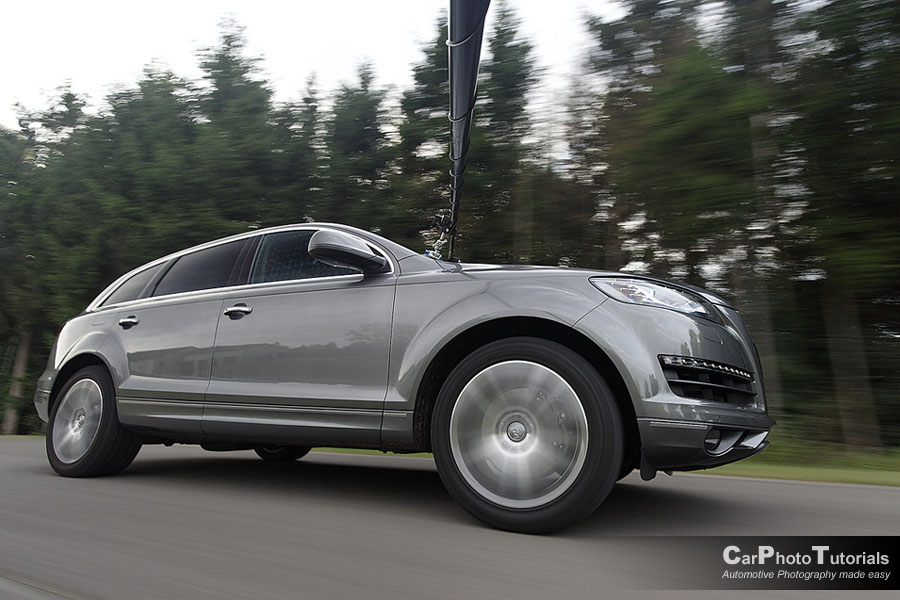
The original photograph as it came out of my trusted old Canon EOS350D, if you think making the rig shot was difficult ... think again, the best is yet to come, I will show you some serious post processing to get the best out of these rig shots, the hard part is just beginning.
One of the first things I will have to take on is removing the boom from the photo, rig shots usually do not show the setup, instead most of the time you only get to see the result after some serious work in front of the computer ... in this tutorial I show you the entire BTS, behind the scenes on how to create an impressive rig shot.
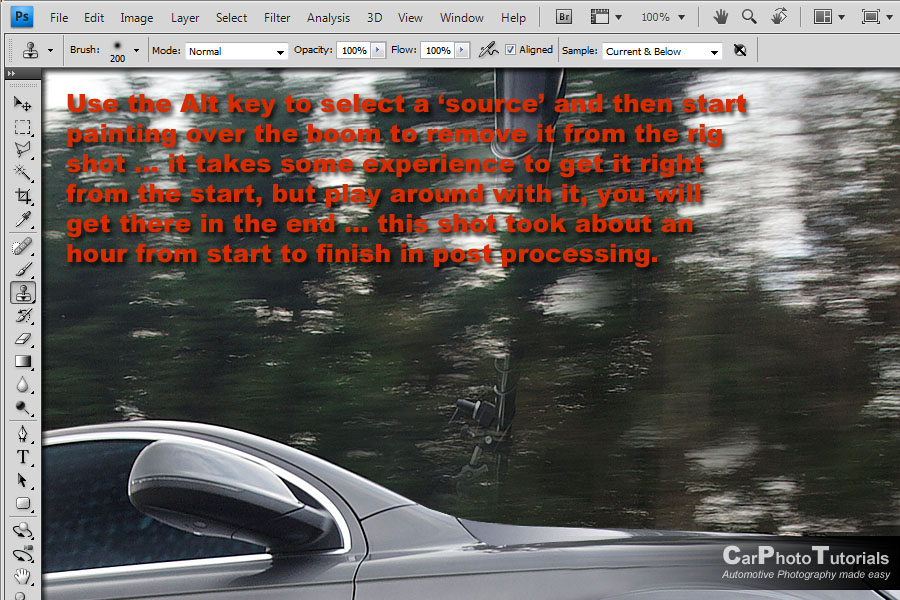
Step 1 : clone stamp tool
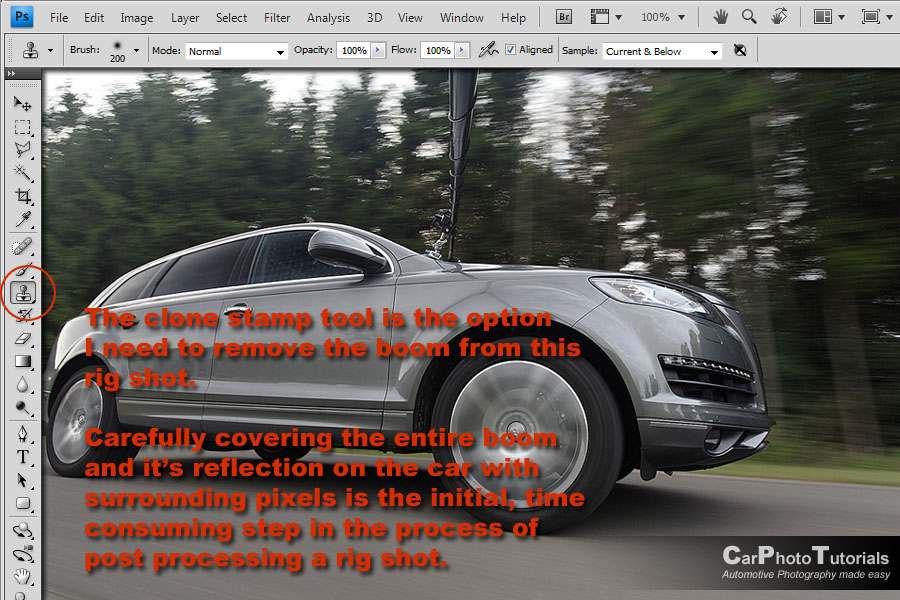
Using the Clone Stamp Tool in PhotoShop you can use surrounding pixels to cover the boom in our rig shot, make sure you select a relatively large, soft brush size to start with so you'll have the edges of the clone stamp nicely blend in with the background ... to finalize the details you'll have to turn to a smaller brush ... in the end the photo has to look like there never was a boom in the first place.
On the car itself there is a small reflection on the fender, this has to be cloned out too, remember that, and search for reflection in the headlights too, these often show a thin line as a reflection of the boom and they are often forgotten during post processing.
Depending on the car and the position of the boom on that car it might be more difficult to completely remove the boom from the rig shot, sometimes it is easier to make a selection with the Polygonal Lasso Tool to avoid cloning over parts that have no need to be modified, in severe cases you'll even have to paint over the car itself as there is no part to 'clone' from, this is where things can get rather difficult, but the more time you put into this first step the better the result will be, so don't cut corners here.
Step 2 : a new background
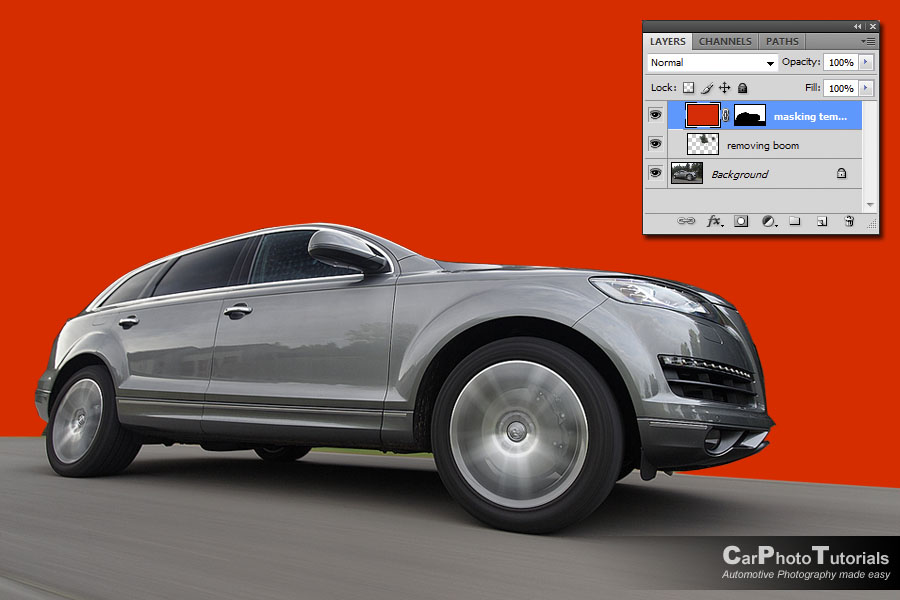
I meticulously removed the boom from the photo only to decide I didn't really like the trees in the background, they just drew too much attention and didn't give the impression I was looking for in this case ... so I started to prepare putting in a new background.
When I'm putting in a new background I start out with creating a new Layer and filling it with a nice contrasting shade, like red in this case and create a Mask by carefully tracing around the car with the Polygonal Lasso Tool, you could use the magnetic version of this tool, but I find it not accurate enough so I do it completely manually.
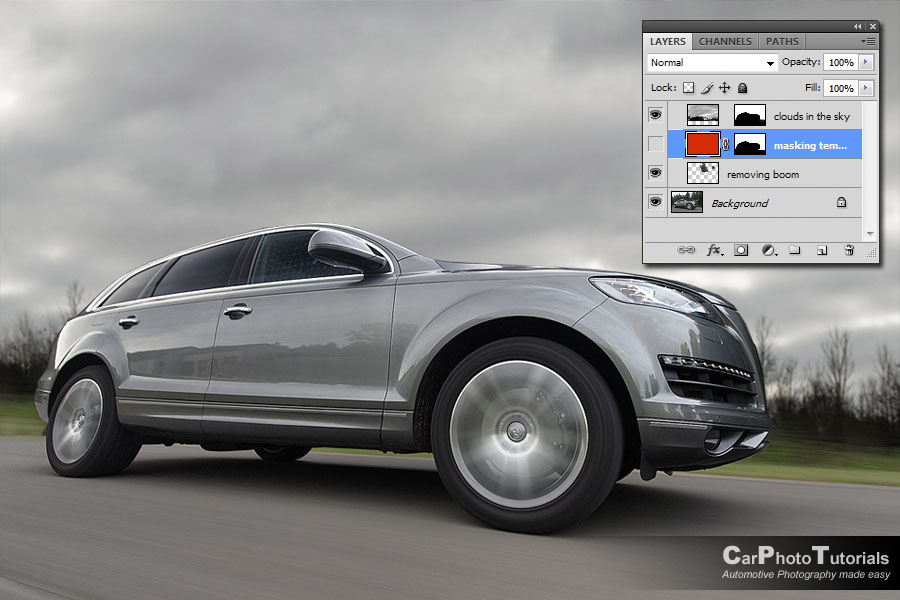
Once you have a nice and tight layer mask to use as a template you can start experimenting with putting in a new background behind the car, I tried an industrial facility but didn't find it right for this specific car so in the end I settled on a nice cloud filled background ... it even showed a few trees at the bottom too, but much less than the original shot.
Now there is one major flaw with this new background ... if it would only contain the clouds in the sky it would not be visible, but since a few trees are shown you notice on big problem ... there is no blur from the movement of the car against the background visible anymore, so I will have to add it to the new trees that are now visible.

Because I made things even more difficult for myself by deciding to use a different background I had to make that new backdrop 'move' behind the Audi, fortunately PhotoShop has a blur-motion filter that does just what I need.
Remember I made a 'mask template' to cut the rolling Q7 from the original background it became very easy to fit the new background in place, but before I performed the motion blur on the still visible trees on the new background I remembered one thing ... in front of the car the motion is much more pronounced than at the rear of the car, where in fact there is almost not motion at all.
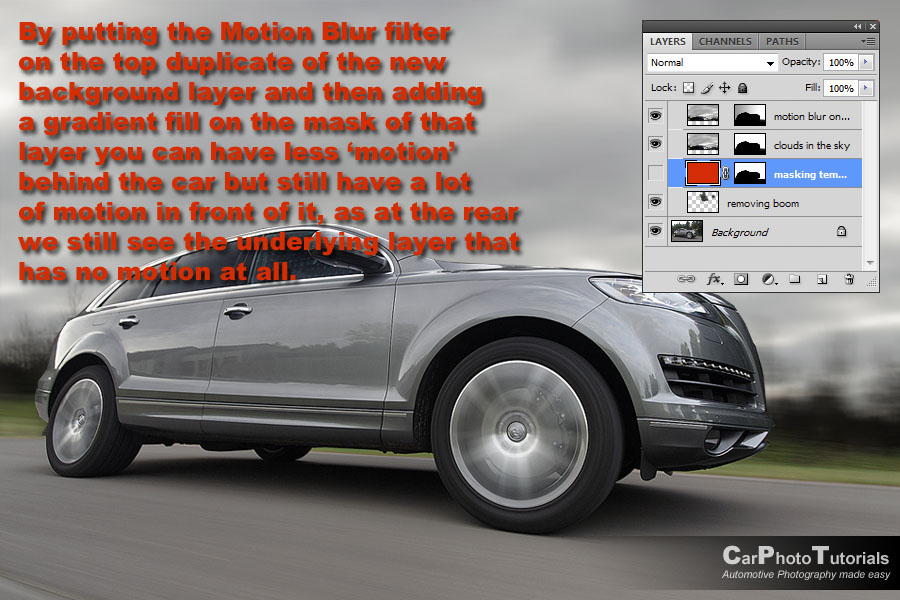
So I made a duplicate of the new background, applied the same mask to it (by Alt-dragging the layer mask from one layer onto the next) and performed the motion blur on the upper copy of the new backdrop, after that I filled the mask from the upper copy with a 50% opacity gradient from black to transparent to show the 'static' part of the underlying background a little behind the car while in front of the car I keep the full motion effect.
The rig shot of this massive Audi Q7 is starting to convey the look I wanted, but there are still a few details I want to modify to get it looking just the way I want it to look.
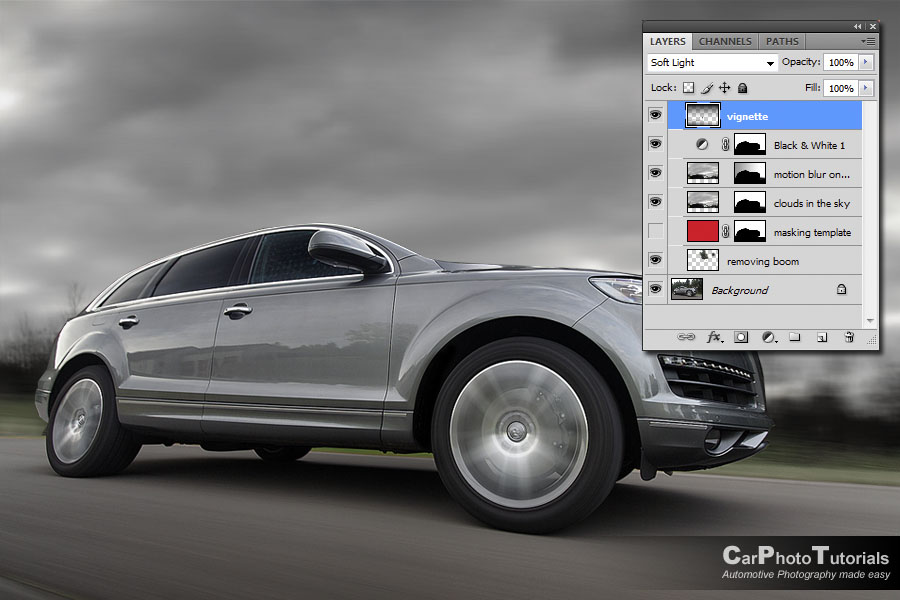
If you have been following my tutorials you know I tend to use a vignet on my photos a lot, and this very simple trick actually draws attention to the car by making sure the background is not the first thing that people look at, this can be done in a few ways, one of them is turning the background into black and white, the other is making sure the car itself is 'in the light' while the background is darkened.
I went for a combination of both, so I added a B&W adjustment layer with a mask that leaves the street and the car alone and only covers the grass, the trees and the clouds ... but I didn't want to remove all the color from the surroundings so I toned down the effect by lowering the opacity of this B&W layer to 50%.
A new layer with the blending mode set to 'softlight' and a gradient fill from pure black to transparent will pull even more attention to the car, I make sure I start the gradient at the top of the frame and end it just when it touches the car, the same thing from the bottom up just touching the wheels ... and you get a darkened, more contrasty background while your car stays bright and shiny, just the way I intended.
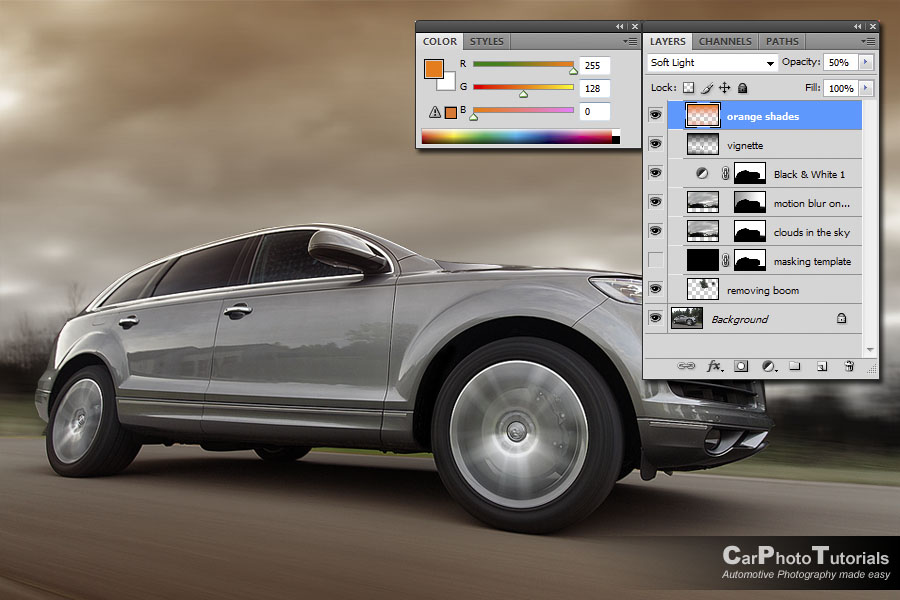
I wanted to have a 'warmer' look and feel to this shot, the car itself is grey metallic and the new clouds in the background show a cool image, so I added yet another layer on top, again with a SoftLight blending mode just like my vignet layer ... but this time I put in a gradient using bright orange, in fact a real orange RGB shade of 255-128-0.
Naturally the effect was totally over the top so I had to lower to opacity of this 'warm sunlight' layer, I settled for a 50% coverage, but when you are performing this kind of post processing feel free to experiment with different settings until you reach one you like.
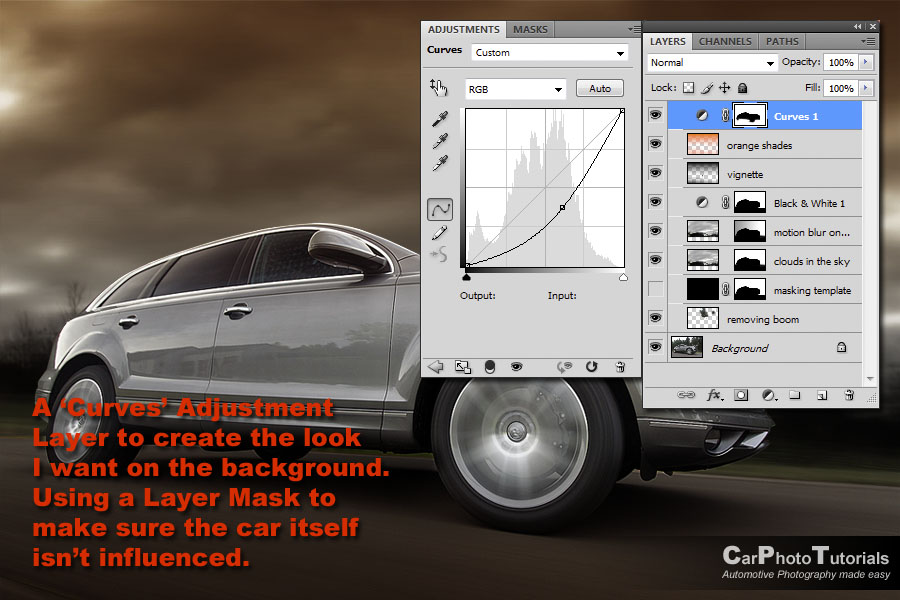
I still felt the image lacked some 'punch' so I added another layer on top, this time a Curves Adjustment Layer, pulling down the entire curves line into an arch made the clouds and road really get the look I wanted, only problem the car itself looked terrible ...
No problem, putting in a Layer Mask and again carefully tracing around the car itself removed the Curves Layer influence on the grey metallic bodywork and wheels so only the clouds and the road were 'intensified' by my arched Curves adjustment ... almost there, I just added another SoftLight layer on top of it all with a black to transparent gradient at only 20% opacity to add just a little more contrast to the clouds ... and I'm done.
BEFORE and AFTER post processing
 (Move your mouse over the photo above to compare the 'Before vs After' shots)
So you see not only does it take some serious preparation and work to take a rig shot, it also takes some serious post processing to remove the boom from the resulting photo and to tweak the surroundings to get that look and feel you want ... but in the end these action shots sure are impressive.
DISCLAIMER this tutorial shows you how to perform a rolling rig shot using a boom and suction cups, in now way can I be held responsible for any damage to you, other people, the car, other cars or the equipment as a result of following the tips mentioned in this tutorial. If you are attempting any kind of rig shot you take full responsibility for any damages you might inflict on the car, surrounding cars, yourself or your equipment.
 |
CPT Premium member BONUS : 88013 CPT members can download this article as a 32 page eBook in PDF, the archive also includes the photo with the post processing in layers for you to check out.. |
Note : commercial use or publishing of our tutorials in any way, written or electronic, is strictly forbidden, we present these for your personal development only. None of our material may be published in any way without prior, written permission from the Car Photography Tutorials founder. All workflows and photographs are copyright protected and owned by the Car Photography Tutorials team unless stated otherwise
Advertisement
Become a MEMBER
Premium Membership
Become a CPT Premium Member and download all our tutorials including a PDF for printing and the result as a PSD file with layers if any.
Interesting articles
Post processing automotive event photographs
We all know the drill, we’ve been to a car show or outdoor event and we’ve encountered some amazing cars but our shots have bad backgrounds so we'll have to revert to post processing to get it right.
Case study - Countach
In this specific case study we will take a look at how to remove unwanted clutter from the backdrop of a shot.

Common mistakes when shooting a car
We all made these mistakes at first, but after gathering some more experience we could pinpoint these mistakes and share them with you so you can avoid them.
Lenses, what do all those characters actually mean ?
Looking for a new lens but got at bit confused with all those terms ? We explain them in understandable English for you.

Case study - Lamborghini Murciélago LP640
We take a look at one of the most difficult scenes, a black car during a bright, sunny summer day in the early afternoon.
Keep up with CarPhotoTutorials
Why not follow us, become a fan, get our RSS feed or mail a link to a friend ?
![]()
![]()
![]()