ADDING AUTHENTIC LOOKING MOTION TO STILL IMAGES
Canon EOS40D - Canon EF-S17-55mm IS f/2.8 - 25mm 1/250 sec f5.6 ISO100
Advanced level tutorial by Mark
One of the things a novice automotive photographer is struggling with might be the fact to get motion in his action shots, panning takes practice, and in some cases it is next to impossible to get real motion in your shots, especially if you are shooting a static car.
If you remember a few basic rules you are able to add authentic looking motion to your static shots in no time using the tricks I'm about to share with you, no need to spend a pile of money on a decent rig or shooting 100 photos to get one decent panning shot, just follow the steps below and you are creating action shots in no time and with little effort.
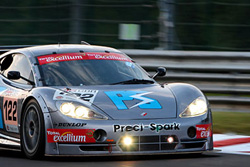
 Naturally the best is to have a nice wheel blur straight out of the camera (or OOC as we call it), like this side shot of a Ferrari during an Italian car event on a famous circuit.
With a relatively low shutter speed of 1/250 this fast moving car still shows motion without any additional processing, but in case you didn't manage to get a sharp shot use the fastest shutter speed possible and add motion later.
When you are out on assignment your customer wants good photos, so if your panning skills aren't up to scratch yet you might revert to fast shutter speeds to at least capture the frame and worry about motion in the shots afterwards, personally I capture one or two laps of the cars at a high shutter speed to get tack sharp images and then drop the shutter speed to 1/250 or 1/160 on race cars and start doing panning shots, in my case most of these are tack sharp too, but if you are just starting to take panning shots you might not be so lucky, so those earlier fast shutter speed shots come in handy.
Remember these basics
Most panning shots are taken from the side, some dead on, other under a slight angle, naturally there are action shots from the front or rear of the car, but don't worry about those yet, as in most cases you don't see the wheels anyway, so there is no need to add motion to them ... or is there ?
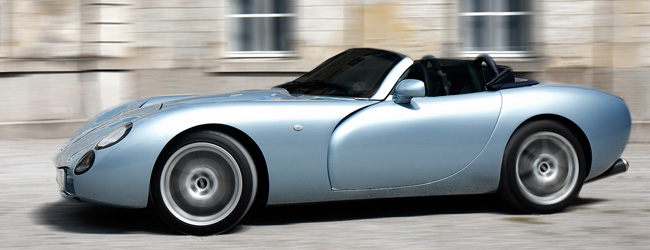
 I will show you how to add motion to a dead on front shot later on, but for now make sure you have a nice side shot to begin your post-processing on, something like this nice looking TVR might do the trick, it's not fully side one, but it will do perfectly for this tutorial.
Any post-processing work you do on your shots can wait until the motion is in place, things like vignetting or color correction can always be done on the resulting 'motion' image, so for now I'll leave it like it is and start working on adding some movement ...
STEP 1 : Isolate the wheels
 I start by loading the image in my trusted Adobe PhotoShop and select the front wheel with the 'Elliptical Marquee Tool (hold down the mouse on the selection tool to change it's shape to Elliptical)
Here it is very important to select as much of the tire as possible, because the tires to spin with the car when it's moving now don't they ? Don't worry if you have to select a part of the fender with the wheel, I'll remove it later on.
 After you nicely select as much of the wheel as possible you should copy it onto a new layer, just press 'Ctrl/Cmd-C'(Ctrl-C on a PC or Cmd-C on a Mac) immediately followed by 'Ctrl/Cmd-V' to paste it in place of the selection, this way you avoid the new layer isn't positioned perfectly on top of the original wheel.
Now do the exact same thing for the rear wheel, do remember to activate the 'Background' layer again, as after you 'paste' you will be on the upper layer, and there is nothing to select towards the rear wheel of the car, so click the background layer again and use the above method to copy the rear wheel too.
STEP 2 : Get the right selection
 Now you have the background image and two layers, one with the front wheel, one with the rear wheel. Which one you would like to start with isn't important, I usually take the front wheel first, so if you've followed the above workflow it should be called 'Layer 1', so click it to activate it again.
IMPORTANT : this step is very important, if you omit it the effect will not work properly, make sure you press 'Ctrl' when you click the thumbnail of Layer 1 ... this way you will make a selection of the wheel again, otherwise the effect would be executed on the entire canvas, and the wheel would not be spinning the way I want it to ...
STEP 3 : Spin it baby
 The selection has been made and I've got only the wheel ready for my next filter, which is actually found under 'Filter > Blur > Radial Blur', it is the filter required to put motion in the wheels ... or to spin the wheels more exactly.
 The window presented will allow you a few settings, for the effect I'm looking for I put it at 'Spin' for Blur Method and set the Quality at 'Best' and put the amount at a level that makes the wheel look good (sadly there is no preview, so you'll have to guess)
If I selected a value I don't like I just hit Ctrl/Cmd-Z to return to the original 'non spinning' wheel and go back to the Radial Blur to experiment with other values, after doing this on some images you get the hang of it and I'm sure you'll be getting the value right within a few attempts.
On a totally still image like this one I tend to go for '50' most of the time, this gives a nice spinning blur without looking over the top, but always remember this is my personal opinion, you might like another value better.
STEP 4 : Play it again
 Remember your car has four wheels, fortunately only two are in view, so you should spin both wheels. Just repeating Step 2 and 3 on the rear wheel will get me the look I wanted on this car, take a look at the shot now, the speed of the car is literally splashing from the monitor.
However, take a second look at the front wheel, you will notice I've blurred a bit too much, there is a small part of the front fender that went into the spin too. No problem whatsoever, selecting the Layer 1 again I can simply erase this part and pull the bodywork of this TVR back into focus.
STEP 5 : The background
I'm not finished yet, not by a long shot, the wheels are spinning, but take a look at the background, it is tack sharp ! I'll have to blur that one too, however this time I will use a Motion Blur, not a Radial Blur.
 As I want to put some movement into the castle backdrop in this shot I will activate the Background layer and duplicate it by simply hitting Ctrl/Cmd-J.
I go back to 'Filter > Blur' but now select the 'Motion Blur' option, I get a new window that again allows me to change some settings, first of all put the angle correct, as this shot is nearly horizontal I went to a 2 degree angle, this totally depends on your photograph, but fortunately there is a preview for this filter, so you can see what the settings do.
The angle set I go for the 'Distance' setting, this is probably the most important value for this effect, too much and you get an artificial look, too little and the effect isn't visible anymore, in this case I went for 50 pixels, but keep in mind that I'm working on a low res file for this tutorial, normally on a full 10 Mpixel file a value of 50 wouldn't show much movement, so keep an eye on the preview as you increase this value.
STEP 6 : Mask it
I now have my spinning wheels and a blurred background ... but wait, the car itself is also blurry, that's not what I was looking for, so I'll have to get it back in focus, that's why I actually duplicated the 'Background' layer, so I can have it 'peek' through the blurry version by using a mask.
 Click on the 'Add layer mask' button found at the bottom of the 'Layers' window (as seen in the screenshot), this will effectively add a mask over the copied background, make sure the white 'mask' is selected and use a brush to paint in black over the mask (hit D to select the white and black colors, now hit X to put black as foreground color, hit B to select the Brush tool, put it at a decent, soft size), now start painting to unveil the underlying layer with the sharp car.
 Just paint over the car until you see the borders of the sharp Background layer, don't worry if you've missed a few spots, I'm using a soft brush to roughly make the sharp car appear and then zoom in to about 200% and use a hard brush to make the background nicely reach the borders of the car.
I'm almost finished, but there are still a few details that I personally want to correct, most people would probably leave it as this, but take a close look at the front and rear of the car, because of the 50 pixels shift you notice a bit of bodywork and the exhaust that is still blurred.
STEP 7 : perfecting to illusion
 If I take a very close look at the car I notice some ghosting due to the Motion Blur filter, this is no problem, just select the 'Clone Stamp Tool' (press S) and make sure it isn't too large (same method as selecting the brush size earlier), I would go for a soft size of 17px or something close.
 Now select a reference point to the right of the ghosting at the rear by holding down the 'Alt' key and clicking the crosshair on that area, now just paint over the ghosting next to the car and the exhaust pipe, don't worry to cover the sharp car, because of the active mask you can never paint over the sharp parts anyway.
This comes with experience, the trick now is to see where the picture isn't right and to clone away those parts, as this is a convertible there is the issue of the windshield showing the background, but I have a nice solution for that one too.
STEP 8 : Final touches
A convertible with the top down isn't really the best option for this motion trick, you have an issue with the background showing through the sides and the windshield ... not a problem, a visit to the window tinting Photo Shop will cure that in an instant.
 The final details on this shot were to blur the tread of the tires to have them actually spinning around too, after that the usual post processing color correction and a nice soft light layer with a gradient from black to transparent and I end up with a very nice, moving TVR.
Naturally having a nice panning shot with a sharp car is much better than having to resort to post processing to create a similar look, but there was no way I would be able to get a panning shot of this TVR, so the only option was adding the movement afterwards like this, the only thing missing is a driver, but that one can also be pasted in from another shot if you really want to.
Some extra samples
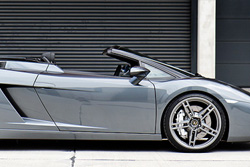
 This silver metallic Lamborghini Diablo SVR is another sample of where the above tutorial comes in very handy, I personally know the owner of this car, a very nice guy with an impressive collection of cars. He asked me to make sure to get some photos of his car on the track, which I would print in large poster format afterwards.
So I didn't take any chances and put the camera in the fastest possible shutter speed the light would permit, it came to 1/1250, which would kill just about any sign of spinning wheels ... but I could simply add that in post processing using the method described above. Naturally I also took some shots at 1/160 and 1/250 as he was putting multiple laps on the track, finally made a large print of a 1/160 shot, but just in case I messed up I could very well use this shot too.
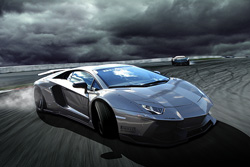
 An Audi R8 is always a great sight, especially when it turns into the parking lot you just happen to be shooting an event for a dealership, so I quickly turned around and was able to get one shot, at a much too fast shutter speed to see any movement in the car.
Again I reverted to post processing to get the look I initially wanted for this shot, added some wheel spinning and background movement to the shot and went to look in my earlier shots to find a nice brake caliper I could use, because of the open style wheels on this car the brake caliper should be visible, and not blurred naturally ... just paste it in from another shot and you're done.
 When I was asked to photograph this massive black BMW X5 tuned by Hamann Belgium I arrived a bit too early at the distributor, the car wasn't totally finished yet, so it couldn't be taken on the road for some action shots ... not a problem when you know your way around this tutorial !
I took a nice shot, not directly from the side but a bit from the back and decided to try my hand at adding movement to it in Photo Shop. Which in this case wasn't as easy as I imagined to be honest.
If you take a closer look at action shots from this angle you'll notice that the background actually turns sharper the further it is away (at the left of this shot) and because of the angle I couldn't use the same technique to spin the front wheel, I ended up taking a front wheel from a dead on side shot and pasting it into this shot distorting it to fit.
Take a look around the photos you've taken lately, I'm sure you'll find some prime candidates for putting this tutorial in action, also as a Premium Member you can download this tutorial including the layered file from the TVR so you can actually see what I did to get the result presented here.
 |
CPT Premium member BONUS : 77645 If you would like to print this article you can download our special PDF which is optimized for hardcopy layout, the archive also includes the photograph used in this article in layers so you can see the progress ... |
Note : commercial use or publishing of our tutorials in any way, written or electronic, is strictly forbidden, we present these for your personal development only. None of our material may be published in any way without prior, written permission from the Car Photography Tutorials founder. All workflows and photographs are copyright protected and owned by the Car Photography Tutorials team unless stated otherwise
Advertisement
Become a MEMBER
Premium Membership
Become a CPT Premium Member and download all our tutorials including a PDF for printing and the result as a PSD file with layers if any.
Interesting articles
Lenses, what do all those characters actually mean ?
Looking for a new lens but got at bit confused with all those terms ? We explain them in understandable English for you.
Your second shopping list
You have all the basic equipment, and you feel comfortable working with it ... now it's time to take your gear to the next level.

Running PhotoShop actions with a G13 or G510 gaming keyboard
I am a big fan of automating workflows in PhotoShop to speed up post processing, after a while I had a lot of ctrl and alt key combinations so I bought a gaming keyboard, first the Logitech G510 and later on I added the Logitech G13
Virtual tuning in post processing
Sometimes the car you want to photograph just doesn't exist in real life, so you start with a regular model and virtually customize it in post processing ... and this time I show you all the steps in a video
Case study - Geneva 2009 Auto Show
In this in depth article we take a look at the specific settings and technique you could use for a high profile car show like the one in Geneva
Keep up with CarPhotoTutorials
Why not follow us, become a fan, get our RSS feed or mail a link to a friend ?
![]()
![]()
![]()