CASE STUDY - DETOMASO PANTERA
Canon EOS5d Mark II - Canon EF24-105mm f/4.0 L IS - 65mm 1/250 sec f4.0 ISO200
Case study by Mark
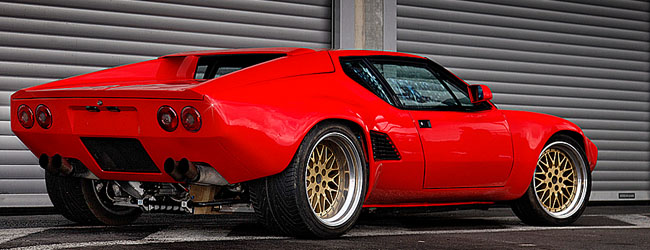
Sometimes you visit an outdoor event and all of a sudden you notice a car parked away from the rest of the pack, being a super car like this red deTomaso Pantera you know you're going to make a killer shot from this rare opportunity ... only problem is the lighting, the sun isn't really in the best position so you start thinking about creating an edge for yourself before taking the shot.
 Above you see the original, out of camera shot, because the car was parked in front of the pit box entrance I had some background distraction to keep as minimal as possible, still I don't like the door in the shot, but I managed to ruin the horizon here too (did it on purpose naturally) you notice this from the vertical lines in the shot, the car is dropping to the right here ...
So first things first, rotating the entire image in PhotoShop making sure the pillar behind the car itself is perfectly straight. Hit 'Ctrl-T' and move the mouse towards one of the corners until you see a curved double arrow, now click and start dragging until you get the concrete pillar perfectly vertical. One thing you have to remember : do NOT rotate and scale at the same time in PhotoShop, the result is terrible, instead do the 'straighten' and confirm that one before cropping or scaling the image, this way the result looks much better.
 So now the car sits level in the shot and I cut the door on the right from the frame, didn't like it in the end to be honest. If you crop (or shoot) a car always leave more room in front of the car compared to the end of the car, this way there is room to 'drive into', a classic trick among car photographers.
When I took this shot the weather wasn't too great, sure the sun was out, but it wasn't putting any power on this car here, it was parked in the shade to be honest, so what do you do in that case : fill in flash ! That's right, in plain daylight I walk around with a Canon 580EX II on top of my 5dII (this model doesn't have a built in flash, and if it did it would have been too weak anyway) ... you can recognize the evidence of this on the rims, the little white speck next to the taillight and more importantly on the outer right taillight ... it's reflecting too much so I have to tackle that first.
 Using the Elliptical Marquee tool from the toolbar in PhotoShop I select the left taillight of the Pantera and copy - paste it onto the right one to hide the flash reflection. To get to the Elliptical Marquee Tool you have to click and hold your mouse on the option in the toolbar as usually the Rectangular version is selected by default, but these taillights are round, so I want to use the other option from the Marquee Tool.
 Once selected I just drag around the left taillight, hit the Ctrl-C combination and hit Ctrl-V at once, this way the new layer with the taillight sits right on top of the original area I selected, now I press V on the keyboard to get the Move Tool and click and drag the new taillight onto the one I'm trying to cover up.
The thing is I'm looking at a perspective here, so when I put the copied taillight on top of the right one, it is too small, no problem, just hit Ctrl-T (Transform) and drag the corners until they nicely cover up the underlying taillight ... it might take a bit of trial and error, but it does work, trust me.
In this particular photograph a second problem with the taillight came up, the shade of red around the left taillight isn't the same as the one on the right, so hit the E key to get the eraser and just remove the surrounding red section on the copied taillight ... and there I go, I managed a perfect match now !
Just take a close look at the shot now, some might think I'm done here, but I'm not even close to be honest, there are still several items I do not like in this shot, the first one being those plugs on the pillar behind the car, they draw attention away from the car and I don't want that, so I will be cloning them out. Hit the S key to select the Cloning Tool, hold Alt and click on a part of the pillar above the car and start 'painting' over the plugs.
 Would you like another tip on this cloning trick ? In this shot you have the roof of the car touching the part we want to clone away, now I could use a hard brush on this, but what I usually do is select the part I want to clone away roughly and make sure I don't include parts of the roof in this selection. This way I don't accidentally clone over the roof section of the car, works like a charm.
 With the plugs gone I take on the next task, that bright orange line and the make of the garage door at the bottom right corner also draw attention, and I want this red Pantera to be the only thing pulling eyes to it, so I will tone down these orange parts ... with a Black and White adjustment layer !
So I go into the Layer menu and select the New Adjustment Layer option, from this list I go for the Black and White option from the list. Only problem now is that color is now missing from the entire image, and that wasn't what I was looking for. So I do a Select All (Ctrl-A) and make sure black is my background color (it should be by default) ... now I hit 'Del' and suddenly I have all my color back in my picture.
Now I select the Brush tool (hit B) and with white selected as my foreground color I just paint over the line ... which turns gray at once because where I paint in white I 'reveal' the Black and White Adjustment Layer again, same thing when I paint over the lower right logo on the garage door, turning it gray makes it draw a lot less attention doesn't it ?
Next thing on the agenda ? Take a close look at the floor around the car, there are some details not right yet, all of these are quickly cloned out, so that's exactly what I'm doing next.
 Almost there now, I have completely cleaned up the crop, those details around the car, on the floor and against the garage door are now gone so nothing is drawing attention away from this bright red Pantera anymore, but I am not finished yet as you might imagine ... look at the image again and tell me what you think about the lighting on the back ?
Yes, the back is darker compared to the rest of the car, this could have been remedied with an off-camera flash, but there wasn't time for that at the event, so I manage this in post processing, and it is rather easy actually. I need a new layer, this time I go into the Layer menu, select New > Layer ... and I make sure the Blending Mode is set to SoftLight. Now I go back to the Brush tool and make sure I'm using a feathered brush (or a soft Brush as Adobe calls them), hit the D key to get the default shades and hit the X to get white as a foreground color.
 Now I just paint over the darker parts of the back of this deTomaso Pantera and behold ... light is getting into the shade, making the red 'pop' even better. However I think the effect is too harsh now, but rest assured, this is quickly solved too ... I just lower the opacity of the layer to about 75% and the effect is just right as you can see above.
It's almost as if I had an extra flash pointing at the rear of the car, or perhaps a reflector to fill in the darker shades ... but this is pure digital post processing, and I'm sure the effect is nearly identical, just take a look at how the undercarriage is lit now and how much detail you see in the tires ... nearly done.
As usual I now add a new softlight layer and draw a black to transparent from top to just above the car and from the bottom to just underneath the wheels, this darkens the surroundings a bit and automatically makes people focus on the bright spot in the middle ... the car in this case, just what I was looking for.
However I think the top can use some more drama, so I add a second softlight layer with a black gradient to emphasize the effect even further, and to really put the finishing touch on this Pantera shot I brush in a little sparkle right on top of the white spec next to the right taillight ... just to complete the illusion.
 Above you can check out the final photograph made from the already decent shot made during an outdoor event, as you can see it sure looks a lot better than the original OOC shot, which wasn't all that bad to begin with, but this just shows that a good photograph is made on site, a great photograph is created in post processing.
I know there are dark areas underneath the taillights ... but these were already there, actually the heat from the exhaust caused these, I did clone them out but I felt it took away from the brutal looks of this car, so I removed the cloning again.
 |
CPT Premium member BONUS : 57003 As a Premium Member you can download this Case Study as a nice PDF document, and the archive even includes the PSD file with this red Pantera. |
Note : commercial use or publishing of our tutorials in any way, written or electronic, is strictly forbidden, we present these for your personal development only. None of our material may be published in any way without prior, written permission from the Car Photography Tutorials founder. All workflows and photographs are copyright protected and owned by the Car Photography Tutorials team unless stated otherwise
Advertisement
Become a MEMBER
Premium Membership
Become a CPT Premium Member and download all our tutorials including a PDF for printing and the result as a PSD file with layers if any.
Interesting articles
Make panning shots like a pro
We all made these mistakes at first, but after gathering some more experience we could pinpoint these mistakes and share them with you so you can avoid them.

DOF - Depth of Field
In this article we take a look at the different aperture settings you can use while photographing cars, setting your DOF can create some amazing effects.

Sharpening techniques explained
A lot has already been written about how to make your images look better, getting them sharp is one of the essentials when it comes to improve your shots
Race photography, a day at the track
You must admit that being track side must appeal to you, but it takes some technique to get the best shots from that position, we explain how to get it right.
Filters in the digital age
On a forum you might have red a discussion about using filters before, is it necessary or not ? We give you some tips.
Keep up with CarPhotoTutorials
Why not follow us, become a fan, get our RSS feed or mail a link to a friend ?
![]()
![]()
![]()