PHOTOGRAPHING SCALE CARS
Canon EOS 40D - Canon EF70-200mm f/2.8 L IS USM - 70mm 3.2 f22.0 ISO 100
Intermediate level tutorial by Mark
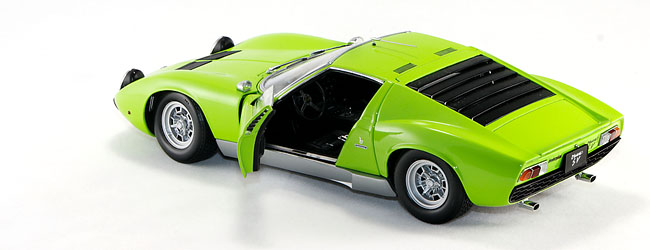
There is one major problem when shooting scale cars ... they are so small compared to real cars that you will need a massive aperture to get everything sharp in your shot, the above image of a green Lamborghini Miura SV in large 1/18 scale took an f-value of 22 to get right.
 With such aperture values comes another problem, shutter speed, as you can see in this shot it was exposed for a full 3.2 seconds, so you will need a decent tripod to mount your camera on while a remote control shutter is another great idea when you intend to shoot scale models, that is why we've made this an intermediate level tutorial as you base equipment will not suffice for this kind of work.
In general there are two approaches to shooting scale cars, you can use a quick setup which is very easy and only requires a large sheet of white paper, or you can go for the more purpose built setup by getting a light tent.
The low cost approach
A nice and low cost solution to photograph cars is to use a sheet of paper to create in infinity background, it is very simple to put together : get something that will stand up (like a folder for instance) and a sheet of paper, now put the paper down in a curve, do not make any angles in the sheet ... and your infinity cove is almost ready.
 Depending on the size of your scale cars the sheet of paper will have to be larger or smaller than A3 (11x17 inch), which happens to be the one in this setup shot. I used a small clamp to hold the paper up, you can find these in most Home Depot stores for next to nothing, they don't put much force on the clamp, but for our purpose they are just right.
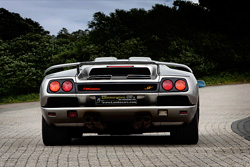
 We used three lights for this image of a 1/43 scale Diablo GTR-S, one to the front of the car, one to the side and one at the top, you can however get away with only two lamps. These can be your regular desk lamps by the way, correcting the white balance can be done in post-processing as you will be shooting in raw anyway.
You could go for those special daylight lamps you can find in most shops, but they tend to be rather expensive, so I didn't use them for this low cost solution.
You can use all kinds of paper sheets in the background, different colors can give different impressions of the car, I wouldn't go for printed diorama backgrounds as they will most likely never look 'real' in the shot, but you can experiment all you like with this low cost setup.
The dedicated approach
 This way of working tends to cost a bit more, but the results are worth it if you are going to shoot many scale models, the above method using a sheet of paper works fine, don't get me wrong, but using a light tent makes things so much easier.
 Light tents or cubes can be found in various sizes, from relatively small to full size ones that can hold a person, for our use a normal size cube of 80x80x80cm (about 32") would be perfect for shooting 1/18 scale models, while a smaller 40cm unit (about 16") works perfectly for those 1/43 scale models.
These cubes can be located in most decent photography shops, one of the better known makes is Lastolite, albeit expensive, they sure offer good quality, a 35" Cubelite for instance is around US $ 110 and is perfect for shooting scale cars up to 1/18 scale.
Looking for a bargain ? Check out eBay, you'll find nice light cubes for as low as US $ 10 for a 16x16" one, naturally the larger are a bit more expensive, but still not in the $110 range. For that kind of money you can buy a complete kit including a cube and lights, which you'll need anyway.
Naturally a tent or a cube is only one part of the equation when you want to take this serious, you will need lights too, here again you can go from budget to state of the art, and you have two main options here actually, either you use your off-camera flash or you use continuous lighting.
Using a flash

The downsides when using off-camera flash are twofold : for one you will need a trigger to activate the flash while it is away from your hot shoe, this can be an expensive hurdle if you want a good radio trigger system (more on those in our professional car shoot tutorial), but more importantly, you don't see what your light will be until you've taken the shot.
The advantage is that you can use the flash on your camera too, so it is not dedicated to shooting scale models, however it is a rather cumbersome method when you are just starting out in this field, knowing how a flash influences your shot comes with experience, hence takes time.
Continuous lighting
We went for a setup with three continuous lights ... on a budget. The trick is that you should look around for special daylight bulbs so you won't be fighting a really bad white balance in post-processing, naturally shooting in raw will solve this, but get some good bulbs, they will make your life a lot easier.
 In our case we went for Fluorescent ones, as they tend to stay cooler when using for longer periods of time. You can buy these with a calibrated color temperature of 5000K or 5500K and more importantly you can get them for less than US $15 a piece. They actually give out the equivalent of 150 Watts of Tungsten light, translating in 2400 Lumins at 1m.
Now we needed something to fix these bulbs, so we bought three Ikea lamp holders, that's right, nice and cheap $9.95 LERSTA units. The best part is that you can turn the heads in all directions, which is very useful when trying to get the look you want in your shot.
Portable studio set
Another option would be to go for a complete portable studio light box tent set, these can be found on eBay for as little as US $ 40 and include a tent, a background, two lights and some even have a small tripod included, which is useless for anything but compact cameras unfortunately. Such a kit would be a nice way to get started without spending a fortune, because we are not finished yet, you will need some more equipment.
Backgrounds
 The background you end up using in your light cube strongly influences your final result, the cubes we have came with a white, a black and a red velvet background. You will need velvet or something similar to keep it from reflecting onto your model, possibly even creating lens flare in your shots.
 We don't really like the red background, hence we only used it for these comparison shots, we must admit that this was the first time we actually used in since we've bought the light cube a few years ago.
The red also gives a color cast on most bodyworks, hence setting the correct white balance is very important when you work with a colored background, we tend to stick with the white and black however.
 Our favorite is the black velvet background, we even got hold of a nice piece of Plexiglas to create that amazing reflection underneath the car, the other side is a high gloss white, so we can use it for both the black and the white backgrounds.
There is one major drawback when using a black backdrop ... dust particles. When you shoot on a black Plexiglas plate you can be sure that there will be dust particles to clean up in post-processing, we've used anti-static spray to clean it, but still it draws dust like no other, combine that with a black velvet background and a black car and you'll be in for some serious work after taking the shot, but that's all part of the fun right ?
Shutter speeds
Another problem photographing scale cars is the fact that you'll need a lot of light to reach high shutter speeds, which are only possible using high power flash units, however as these cars aren't going anywhere in a hurry, you can use very long exposures with normal continuous light.
 If you are using a flash based setup you could end up with shutter speeds up to 1/60, however with our continuous light setup we tend to go much lower, with an aperture of f/22 we get a full 4 seconds exposure with the black background, using a white background will give us a 0.5 second shutter speed.
Because of these rather slow shutter speeds you can forget about hand holding your camera, you will have to invest in a decent tripod if you want to take any kind of decent scale car shots without reverting to a strobe based system.
The tripod
To keep your camera perfectly still during a 4 second exposure you will need a sturdy tripod ... which translates into an expensive one unfortunately. We will be putting together an entire tutorial on selecting your tripod, but for now we will give you the basics to make the best possible choice.
We won't go into too much detail here but one thing to remember is that with a tripod you get what you pay for, don't go for a cheap one, get a good one that could last a lifetime, otherwise you will be shopping for a new one in the future (we've went over three different tripods before settling on our current one).
If you don't want to spend too much money at this time we would suggest looking into the Bogen/Manfrotto tripods, they offer a very nice value for money range, their 055XproB and 190XProBfor instance are great units by the way. if you have some more money to spend a Gitzo might be a good idea.
 A tripod has to meet a few important criteria : it should be high enough for you, so the first selection depends on your physical length, do remember that the head and camera go on top of it, so the tripod itself can be a little less tall. The taller you go, the less stable the tripod gets unfortunately, also don't extend the central column if your tripod has one, they tend to make the combination prone to vibration.
Another very important criteria is the maximum weight the tripod can carry, put your heaviest lens on the camera, install the flash and put it all on the scales, double that weight and you've got the figure you should look for in a tripod. This way you will be sure the tripod will be stable during your long exposure shots.
The tripod is only the first part, you will also need a head to put on top, here again their are makes and models galore, selecting the one for you can be intimidating. We use a pan/tilt head on our tripod, many people these days use a ball head, but we feel the pan/tilt combination allows a much more precise adjustment, especially when shooting cars.
Bottom line : get the most expensive tripod/head combination you can afford, you will not regret it. For instance a nice Bogen/Manfrotto 055XProb with an 804RC2 3-way pan/Tilt head will set you back about $250, but will stay with you for years to come.
The lens
 Naturally the lens you are using for these shots is important, but that doesn't mean you can't use your standard kit lens, take a look at the shot of this black Low Rider, it was taken with the old EF-S18-55mm lens ... mounted on our old EOS 350D, you can't get any cheaper than that, now can you ?
 Now normally we would be using a nice little EF50mm f/1.8 for these shots, it only costs about $100 and it is tack sharp, the smaller models like 1/43 do require another lens as you won't be able to focus close enough with the 50mm, hence we use a Canon EF100mm f/2.8 USM Macro lens for those little ones.
On the other hand, why not use our zoom for these scale models ? For one a prime is sharper most of the time, however a zoom is more practical, so we tend to use our trusty EF70-200mm f/2.8 L IS USM too for scale models, and with some very nice results we might add.
Optional extras
 When you decide to take this serious we would advice you to invest in a few more extras, like the Angle Finder you see here. This is without a doubt the most useful accessory you can add to your camera when shooting scale cars (and real cars for that matter).
It actually allows you to look down into the viewfinder, putting a lot less strain on your back as you won't need to squat down to be able to compose the shot, an Angle Finder is also very handy when taking low angle shots of real cars, no need to get flat on the ground anymore.
 Another 'must have' is a remote shutter control, either by wire, IR or radio. The wire ones are cheaper and work just as well hence we went for that one. This little gadget allows you to activate the shutter without touching the actual camera.
This way you are absolutely sure you won't 'rock' the camera when you press the shutter, allowing you to go for a super steady shot with a long exposure (as long as you don't touch the tripod in the mean time), we use a remote just about always in fact, it is just so handy with the camera on a tripod.
 |
CPT Premium member BONUS : 53467 If you would like to print this Photographing scale cars article you can download our special PDF which is optimized for hardcopy layout. |
Note : commercial use or publishing of our tutorials in any way, written or electronic, is strictly forbidden, we present these for your personal development only. None of our material may be published in any way without prior, written permission from the Car Photography Tutorials founder. All workflows and photographs are copyright protected and owned by the Car Photography Tutorials team unless stated otherwise
Advertisement
Become a MEMBER
Premium Membership
Become a CPT Premium Member and download all our tutorials including a PDF for printing and the result as a PSD file with layers if any.
Interesting articles

Use a mouse or a tablet for post processing
Perhaps a mouse isn't the most appropriate option when working on automotive photos in post processing, so let's take a look at a pen and tablet.

Sharpening techniques explained
A lot has already been written about how to make your images look better, getting them sharp is one of the essentials when it comes to improve your shots

Photographing an indoor car show like a pro
Indoor events and motor shows are great venues with many stunning cars, shooting them is not at easy as it might seem however.
Background replacement made easy
There are times you've managed to photograph a great looking car, but the background is far from good looking ... no problem, just replace it with a different one.

Car photography that sells the car
Selling a high performance car isn't easy, but as they say : a picture speaks a thousand words. We'll show you how to get the winning shot that will sell the car quickly by selecting the correct background and perform the right post processing.
Keep up with CarPhotoTutorials
Why not follow us, become a fan, get our RSS feed or mail a link to a friend ?
![]()
![]()
![]()