USE A MOUSE OR A TABLET FOR POST PROCESSING

Image © Wacom - www.wacom.eu
Fast tips by Mark
I've been receiving several questions about this subject : "Can I use a mouse for photo retouching or do I spend some serious money on a tablet ?"
Problem is : there is no easy answer to this one, it all depends on so many variables that I can't decide this one for you, some people use a tablet with a pen, others can do everything just fine with a decent mouse ... the 'decent' being the most important word in that sentence.
With your standard mouse you could be in trouble, the resolution of it isn't something to write home about, if you are still using one with a ball you're in for even more trouble ... get a laser mouse ! Even those nice optical mice can loose grip on some table tops, but a good laser mouse keeps it all going much longer and without reverting to mouse pads, which I don't like anyway.
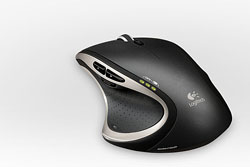 Personally I use a Logitech mouse, at the moment a Performance MX version, wireless, very high resolution and it can cope with daily, heavy use, and best of all, when the battery gets low you just connect a mini USB at the top of the mouse and you can continue working, similar to a wired mouse ... so there is no time loss anymore with putting a mouse in a cradle or loading expensive batteries into it.
This is the mouse I use on both my portable PC and on a MacBook Pro, which is just amazing, one mouse for two Operating Systems. The portable Mac is used for tethered shooting (more on that in another tutorial) and a mouse is nice to have in most cases, I don’t use it all the time, but it's in the bag anyway.
The reason I went for this type of Logitech mouse is simple, it features a lot of buttons I can program myself, naturally the usual back and forward for browsing and the scroll wheel are there, but also a nice zoom button, program switch button and a double click when I click the wheel ... just the way I'm used to a mouse these days, I tried other mice too, from Microsoft for instance, but none worked the way I wanted to like a Logitech did, so I went back for a Performance MX.
My desktop is a PC (why did I go for a PC I explain in yet another article) that is equipped with both a mouse and a tablet ... now why would I do that ? The answer is simple … because of MS Windows 7 ! Don't get it ? ... I'll explain : I'm a big fan of using multiple monitors on my computer, I really like the way I can have PhotoShop open with the image on one screen at full resolution and all the menu items and tools on the second monitor, so they don't obstruct me viewing my image.
So I now have two 22" displays side by side and my latest PC runs Windows 7, but when you have a tablet it only works on the main monitor (you know, the one that shows the '1' when you identify them), so unfortunately I can't get any of the tools with the pen, I have to use mouse to do that.
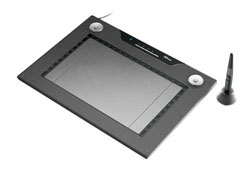 I'm using a cheap Trust tablet and it works fine (besides the Win7 dual screen issue) so why would I spend over four times that amount to get a Wacom tablet ? For one, you can't use this specific Trust tablet on a Mac, a Wacom works on both PC and Mac, and I'm sure the Wacom can sustain more intense work when compared to the Trust unit. But I didn't want to spend too much money on something I didn't know so I stepped up the tablet ladder with a nice and cheap Trust unit, and I'm happy with it for now, and best of all you can find it at €149 these days.
UPDATE the dual screen issue with MS Windows 7 has been solved, so the pen can now be used over both screens when working in PhotoShop under Win7 !
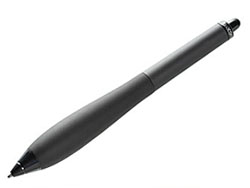
Working with a pen is so much more natural ... press a little harder and you get a thicker line in PhotoShop, press ever so slightly and you get a hairline ... perfect for retouching and cloning ... ever tried to put your signature on a digital letter with a mouse ? Once you get used to a pen and a tablet you'll have a hard time reverting back to a mouse to process your photographs, so think about getting a nice tablet and try it for yourself.
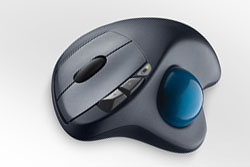 Note there is also a third option : the trackball. This little device uses a ball and optical sensors to detect you moving it with your fingers, most of the time with your thumb by the way. I've used them in the past and a trackball is great for regular computer work like selecting a menu when you are typing or surfing the internet … but it is rather difficult to work with for post processing, especially for drawing or cloning ... I can however recommend the combination of a tablet and a trackball !
The advantage of a trackball is the fact that it remains static, you move the ball with your thumb or fingers, but the base remains in the same, confined space, ideal for a desk with limited workspace (when you also have a large A4 tablet for instance ...), a mouse you must pick up from time to time because you run out of desktop real estate, a trackball never runs out of space. So you can get away with a wired trackball while I would strongly advice you to get a wireless mouse so you don't get the wires all tangled up while working … I like a nice and clean desk, it's more relaxing than a cluttered one, so the least wires possible is fine by me. (I used to have a wireless keyboard by the way but changed back to a 'wired' one recently).
Bottom line : first of all get a decent laser mouse to start with, I'm sure this will help you in your post processing tasks, if you want to take it to the next step try a tablet, but keep the mouse at hand (especially the first few weeks) as a tablet with a pen takes some getting used to.
 Once you get the hang of using a pen on a tablet and you rarely use the mouse anymore during your post processing work you could think about getting a trackball for all that other fun stuff you perform while sitting behind those monitors.
So which mouse should you get ? I will take a Logitech any day, but that's just me, there is no reason why you shouldn't get another make, but what is really important is getting some real life touch … go to a local shop and take some mice in your hand to get a feel for them, I have a large retail store nearby that has a lot of mice on display, so I try them before I buy, because if the mouse is too small or too large for your hand it doesn't give a nice feeling after hours of post processing at home.
My advice if you can spare the money go for a Wacom tablet, it is THE best solution for retouching images and detailed post processing that requires cloning, drawing, erasing and other stuff where resolution and precision is key to getting the best possible results, however when you do decide to go for a tablet things might get complicated ... there are various options to choose from, I'll walk you through some of the Wacom options :
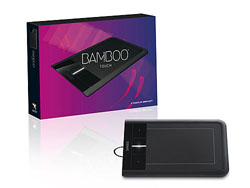 the Bamboo series : a very nice, low cost way to get started in the world of tablets, a bit limited in pressure levels if you go for the 'pen' version, but it gets the work done for you, I would advice going for the Touch or the Fun version, these also offer touch input and function buttons. Not too expensive yet and you can source them from most local electronics shops, sometimes even with a rebate or some kind of discount. From time to time the 'previous' edition even shows up in low cost grocery giants over here in Europe ... probably the best way to get you started without braking the bank.
In the Bamboo series you have the normal version, the Bamboo Pen, Bamboo Touch, Bamboo Fun and some special editions, I would go for the Touch version if possible, it offers a nice number of specs not available on the Pen version while not being way out of reach for most of us ... do look around online for any of these, as prices can differ a lot from one retailer to another.
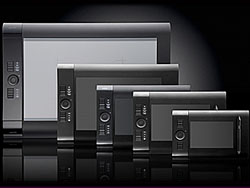 The Intuos series : this is the pro-series from Wacom, and they are worth every penny you spend on them ... problem is you'll have to spend lots of pennies on them but trust me, once you have worked with one you will have a hard time going back to mouse post processing. The Intuos series exists in various sizes, I would advice the Intuos 4M or the Wireless version, the S is too small while the L and XL take up too much desk space to be honest.
Another detail about the Intuos 4S : it doesn't show the labels next to the buttons in blue, the S model is the smallest one, and there just isn't space to 'label' your buttons, so another reason to go for the 4M model, and to avoid fiddling with wires opt for the Wireless version as it is so much easier to use ... by the way, don't forget to order the nice carrying case with it, for only €25 it protects you expensive tablet when not in use, and at €300 for the Intuos 4M Wireless you can't call it a bargain now can you ?
The Cintiq models : truly the top of the line, these are actually full feature monitors that allow you to paint right onto the screen with a pen ... amazing, very easy to work with, but also rather expensive, so not for everyone sadly.
Now as I already mentioned, I'm currently working with a relatively cheap Trust tablet, the TB7300 to be specific, cost me less than €100 a few years ago, today it is available for about €150 but sometimes you can locate it at a discount. It's a rather big tablet, so perhaps the smaller versions would be better suited to test drive, but remember these only work on PC's, Trust has only one tablet that is specific for Mac operating system, so keep this in mind when you go shopping ... but I'm saving up to go for a Wacom Intuos 4M Wireless anyway, after almost two years my Trust tablet has seen better days, especially the protective cover, so it is time for me to change up to a Wacom finally.
Bottom line if you can spare the change go for a nice Wacom Intuos tablet, preferably the 4M or the Wireless version, if you don't want to part with that kind of cash a nice Bamboo Touch will do the job very nicely too and won't take up too much space ... once you've made yourself used to a pen and a tablet I'm sure you will enjoy post processing your automotive photograph even more.
Disclaimer the photographs in this article are used for review purpose only, all are protected by international copyright and remain the sole property of their respective owners that are mentioned with each image title.
 |
CPT Premium member BONUS : 23754 Download this article as an easy to read and print PDF, only available to Premium Members however. |
Note : commercial use or publishing of our tutorials in any way, written or electronic, is strictly forbidden, we present these for your personal development only. None of our material may be published in any way without prior, written permission from the Car Photography Tutorials founder. All workflows and photographs are copyright protected and owned by the Car Photography Tutorials team unless stated otherwise
Advertisement
Become a MEMBER
Premium Membership
Become a CPT Premium Member and download all our tutorials including a PDF for printing and the result as a PSD file with layers if any.
Interesting articles
Filters in the digital age
On a forum you might have red a discussion about using filters before, is it necessary or not ? We give you some tips.
Must have base equipment
In this article we talk you through the large amount of camera's you could buy to get started well in automotive photography.
Case study - DOF, Depth of Field
This shot was taken while the black Ginetta was leaving the pit lane at a famous circuit in Belgium, it looked good straight out of the camera, but a little bit of tweaking made it perfect.
Off camera flash car photography, part 1 of 2 : the shopping list
In this first part of the off camera flash tutorial I take you over the required equipment to get started using additional light sources.
Car photography that sells the car
Selling a high performance car isn't easy, but as they say : a picture speaks a thousand words. We'll show you how to get the winning shot that will sell the car quickly by selecting the correct background and perform the right post processing.
