BLACK AND WHITE CAR PHOTOGRAPHY AND SELECTIVE COLORING
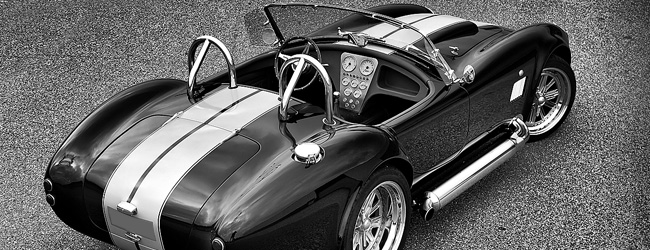
Canon EOS40D - Canon EF 24-105mm f/4.0 IS USM - 32mm 1/50 f4.0 ISO320
Intermediate level tutorial by Mark
Sometimes a car shot just comes out better in black and white, especially when the car in question is a classic car or the surroundings are just better when seen in black and white, that is why we take a look at how you can convert your color shot into a decent black and white image using our trusted Adobe Photo Shop (in this case the CS3 edition).
I know most modern dslr cameras can take the shot directly in black and white, but we never use this option, we always take the shot in color (with the AdobeRGB profile) and perform any modification in post processing, just the way it should. Remember when you take the shot in black and white on the camera there is no way to get it back in color, and that would be sad if one day you actually need a full color shot, so take our advice and do all necessary work and modifications in post processing.
We first take a look at an image we'll convert into a black and white shot altogether, afterward we'll do some selective black and white conversion to make the car stand out even further and take a look at a third option to get some perfectly neutral shades on a white car.
Preparing the original photographs
 Now before we start working on this shot to make it a good looking black and white conversion we have to make sure the basics are dealt with, this means stuff like the license plate, which was glued on this car, so we couldn't remove it, hence we 'painted' over it in post processing, not the best possible solution, but it worked for this shot so we'll leave it at this for now.
But there are a few other things that just had to be rectified before taking it to the black zone ... take a close look at the rear fender, close to the top tail light you'll notice a reflection from our photographer. On such a shiny car things like this just can't be avoided, however it only takes a few seconds on your computer to remove this detail.
 We prefer not to do any 'destructive editing' on our shots, that is why we always use layers to perform any post processing on whenever possible, so add a new layer and call it 'Remove reflection' (Layer > New > Layer ...), now select the Clone Stamp Tool in Photo Shop (Press 'S' on the keyboard) and sample a nice spot close to the reflection by holding down the 'Alt' key and clicking the area with your mouse (it helps if you zoom into the area you want to work on, at least 200% in our case). Make sure you have a small brush size as it is really a detail we are 'cleaning' here, no need to get out the big tools here, the trick to using the Clone Stamp Tool correctly is to have a result that doesn't look like something was removed after all, so no big moves here, just some small, minor strokes of the pen will do perfect here (naturally a tablet is much easier in this case compared to using a mouse).
 A second modification we performed in post processing before going on with our conversion was adding a soft light layer and toning down the chrome on this Cobra. As the original color is a rather dark blue the chrome was just a tad over exposed, we could have remedied this by taking multiple exposures or even by using different settings while 'developing' the RAW shot in PhotoShop (you did remember to take all your shots in RAW right ?), but there is also a quick solution to get at least one stop difference ... painting on a soft light layer !
 After adding the new layer make sure black is your foreground color (press 'D' on the keyboard) and select the brush tool to paint on this new layer (Press 'B' on the keyboard), select a nice soft edge size for your brush and paint over those parts on the image that appear too bright to you. This is a totally subjective matter, so it is all up to your personal taste just how far you want to take this, we've went for the chrome only, but you could also opt to darken parts of the bodywork, or the concrete. By the way, if you want to lighten parts of the shot you can do this the same way, but by painting white instead of black, if the effect it too harsh you can always tone down the opacity for the brush.
The actual conversion to Black and White
Now we're ready to actually turn the original full color photograph into a nice black and white image as we intended all along, and naturally we are using yet another layer for this, this time not a regular layer but a new 'Adjustment Layer', more specifically the Black and White one.
 So select the Black and White option from the New Adjustment Layer option and initially hit the 'Auto' button to get a first impression of how your image could look without using any color (Layer > New Adjustment Layer > Black and White ...), this might look right at first glance, but trust me, it isn't perfect. A correct black and white conversion will need some fine tuning, so start moving those sliders in this dialog box, especially the 'Blue' and 'Cyan' ones as this car is a dark blue one originally, changing the other sliders won't have much effect on the result ... but experiment with them anyway to get a feel of the power in this adjustment layer.
 We actually settled for a setting of Cyan at 10 and Blue at -10, this gives a slightly darker overall look of the image compared to the 'Auto' selection, and we prefer it this way, however this is not science but just our eye, on our calibrated monitor this looks right to us, but we can imagine you prefer other settings, so try them out and move those sliders until you are satisfied with the image.
Selective coloring
Converting an image into a black and white version is only the first step, now we can do some amazing things with this method, how about adding a touch of color back into the image ? And this is easier than it sounds to be honest, take a close look at that Black and White adjustment layer, you'll notice it actually already has a mask over it, so if you paint with a black brush on this mask you'll have the underlying layer 'shining' through again, in our case the color of the original image.
 In this image it would be nice to have the tail lights back in red, so just select a rather small brush, make sure black is your foreground color and paint over them ... magically they turn back to red and amber. While we're at it let's also put the interior back in color, here it is very important to work correctly as otherwise you'll get the blue of the bodywork back in view, so a very small brush will be needed where the interior touches the bodywork.
Naturally selective coloring is much more than what we've used in this image, but a full depth tutorial on this amazing way of modifying car photographs will be published in the near future, for now this is actually all we needed for publishing this Cobra image.
Warm and cold ?
Now what am I rambling about here you might ask ... but as a matter of fact you can have a warm or a cold grey, so when converting a color image into a black and white image the same can be done, you can create a 'warmer' look of the image by making it ever so slightly brown or on the contrary have a 'icy' look by putting some blue into the equation ... it's all about feelings here, so let's take a look at this image in both a warm and a cold shade.
 To get a slightly warmer feel in our black and white image is easy, just click the Adjustment Layer again and select the 'Tint' option at the bottom of the dialog box, now type in 40 for the Hue and set the saturation until you are satisfied with the look and feel of the image. Make sure not to put too much saturation into the shot, this will effectively give a sepia look, and that wasn't what we were looking for this time (could be useful for another image however).
 Getting a cold feel from our black and white image is just as easy, only now select the Hue to be 175 (which actually is a cyan shade) and again adjust the saturation to make the image look right, we've gone for only 3 percent here because we like the look, but naturally you can put just about any percentage you like into it, only remember that subtle is sometimes better than over the top.
As with every post processing the end result is always a personal look, we might like the normal, neutral look of the image, but we've had many customers that actually like the warm look better, it's all about taste, and we all know that this is the one thing you never discuss about with your clients ... the customer is always right ... right ?
 |
CPT Premium member BONUS : 45986 As a CPT Premium Member you can download this tutorial as an easy to print PDF, we even included the Cobra image used in the article so you can open it on your computer |
Note : commercial use or publishing of our tutorials in any way, written or electronic, is strictly forbidden, we present these for your personal development only. None of our material may be published in any way without prior, written permission from the Car Photography Tutorials founder. All workflows and photographs are copyright protected and owned by the Car Photography Tutorials team unless stated otherwise
Advertisement
Become a MEMBER
Premium Membership
Become a CPT Premium Member and download all our tutorials including a PDF for printing and the result as a PSD file with layers if any.
Interesting articles
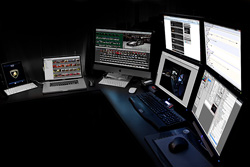
Buying a dual screen setup might be the best idea you ever had
Instead of going for one very large and expensive monitor why not invest in two smaller ones and expand your 'monitor real estate' even further, allowing you to post process photos full screen with all the tools out of the way.

Action photography using a car rig with suction cups
Suction caps are commonly used to attach a boom onto a car so you can position a camera at a fixed point from the car and take a photograph while the car is moving to create impressive action shots.

Sharpening techniques explained
A lot has already been written about how to make your images look better, getting them sharp is one of the essentials when it comes to improve your shots

Use a mouse or a tablet for post processing
Perhaps a mouse isn't the most appropriate option when working on automotive photos in post processing, so let's take a look at a pen and tablet.

Case study - Lamborghini Murciélago LP640
We take a look at one of the most difficult scenes, a black car during a bright, sunny summer day in the early afternoon.
Keep up with CarPhotoTutorials
Why not follow us, become a fan, get our RSS feed or mail a link to a friend ?
![]()
![]()
![]()